Running 64-bit PowerShell Scripts and Modules in Jenkins

This article was written by June Castillote. He is a frequent contributor to the Adam the Automator (ATA) blog. If you'd like to read more from this author, check out his ATA author page. Be sure to also check out more how-to posts on cloud computing, system administration, IT, and DevOps on adamtheautomator.com!
Jenkins is a great tool for automation. It can run many different automation jobs and with the proper plugins installed, it can run PowerShell scripts, too! However, Jenkins is a 32-bit program. When Jenkins calls PowerShell to run scripts, the PowerShell binary called is also 32-bit that you can see in C:\Windows\SysWOW64\WindowsPowerShell\v1.0.
Scripts or modules that require 64-bit PowerShell will not work natively with Jenkins. But don't worry because there are methods that can help you run scripts and use modules in 64-bit PowerShell in Jenkins - and that is what you will learn in this post.
Prerequisites
Since this is a walkthrough article, there are a few requirements that you must have if you plan to follow along with the examples. The examples in this article will be based on:
- Jenkins installed on a Windows server with all suggested plugins installed. All examples will use v2.204.1 in this article. Learn how to install Jenkins here.
- A script editor like Visual Studio Code, Notepad++ or PowerShell ISE (optional)
Installing the PowerShell Plugin in Jenkins
The default installation of Jenkins does not include the plugin that allows Jenkins to run PowerShell scripts by default. To add this feature to Jenkins, there is a need to install the PowerShell plugin.
The PowerShell plugin allows Jenkins to invoke PowerShell as build scripts. It uses
PowerShell.exeon Windows andpwshon Linux.
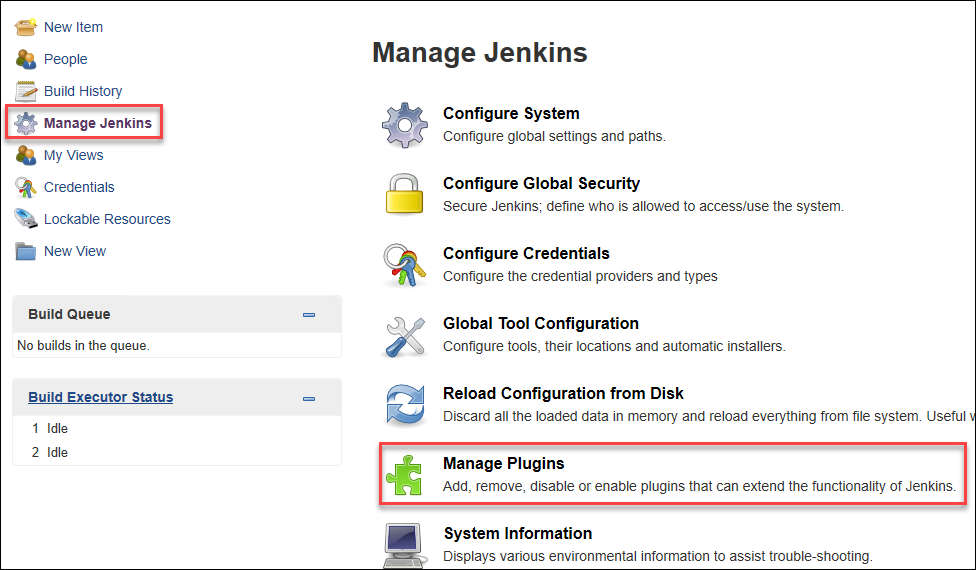
To install the PowerShell plugin, from the Jenkins home page, click Manage Jenkins —> Manage Plugins.
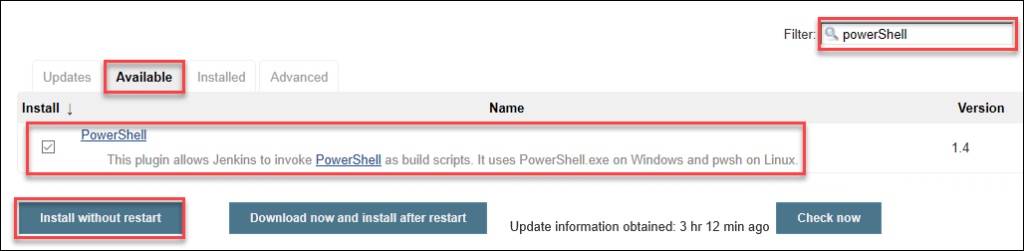
Next, go to the Available tab, then in the Filter box, type in PowerShell. You must see the "PowerShell plugin" in the results under the Available tab.
Put a check on the PowerShell checkbox and click Install without restart as shown below to begin the plugin installation.
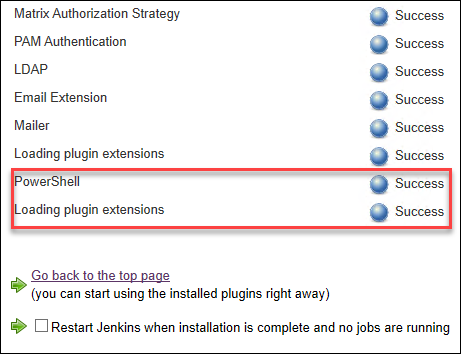
The page will show the installation status and from it you can see if it' already complete. The screenshot below shows the successful installation and loading of the PowerShell plugin.
Creating a PowerShell Script Project
Jenkins is now ready to run PowerShell scripts. In this section, you will learn how to create your first PowerShell test project.
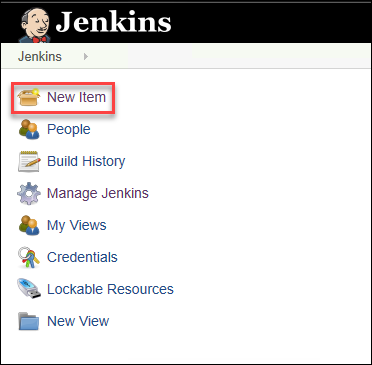
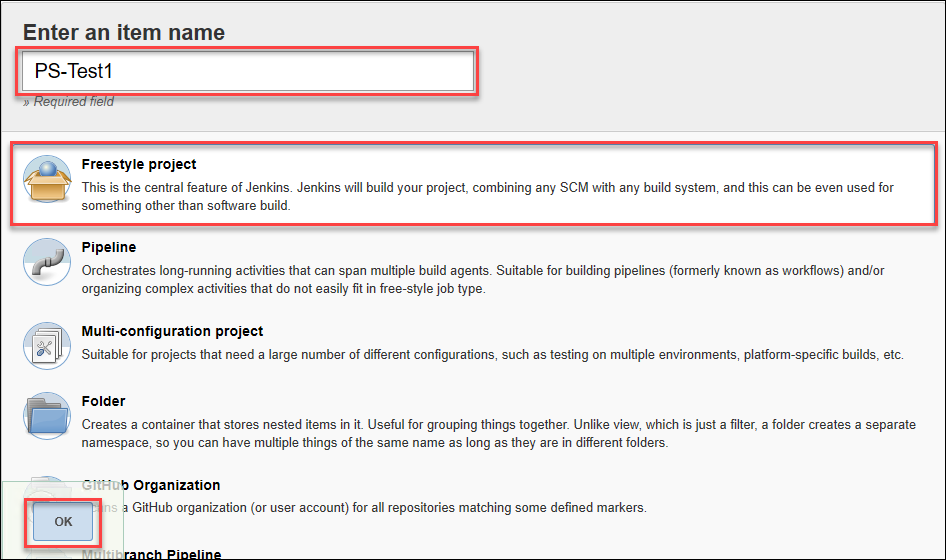
From the Jenkins home page, click on New Item.
You will see a prompt that will ask you to enter a name for the item you are creating. Use the name PS-Test1 but feel free to use whatever name you wish here. Click the Freestyle project option from the list and click OK. See the screenshot below for reference.
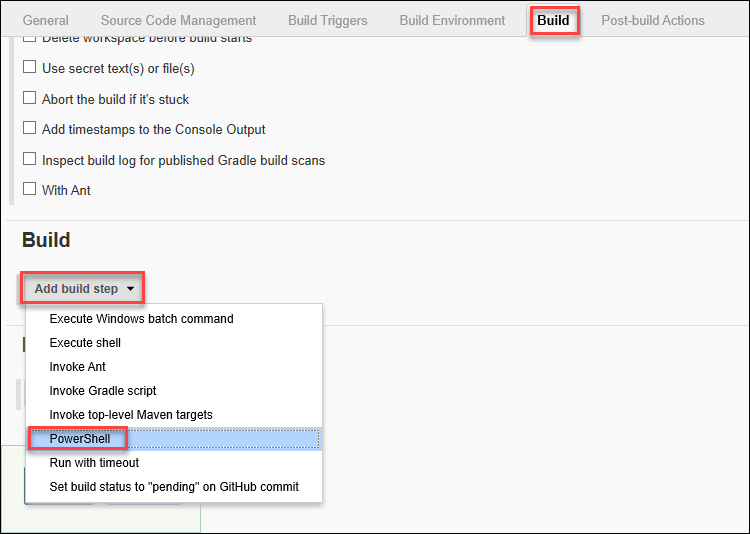
Go to the Build tab, click on the Add build step drop-down and select PowerShell from the list.
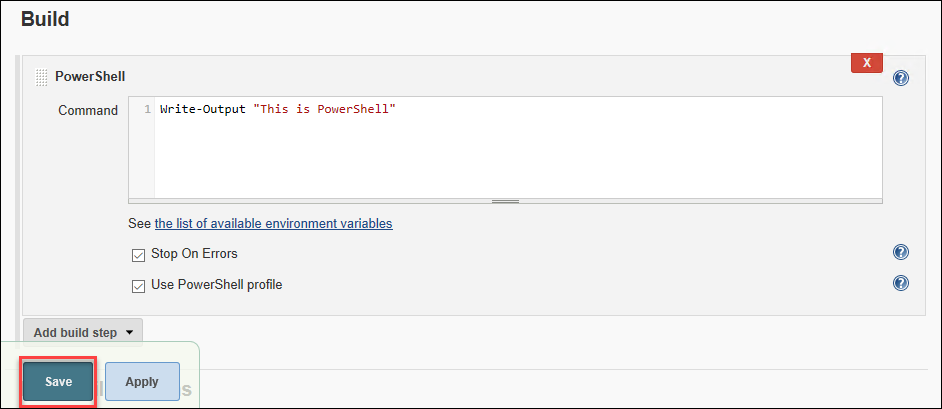
After clicking on PowerShell from the list, a Command box will appear. This box is where the PowerShell script will be entered and saved.
For testing purposes, enter a single line of code Write-Output "This is PowerShell" and click Save.
Testing a PowerShell Script Project
Now that you have created a test PowerShell script project, your next step is to confirm that the project is working. In this section, you'll learn how to manually trigger a project in Jenkins.
In Jenkins, each job execution is referred to as a "build".
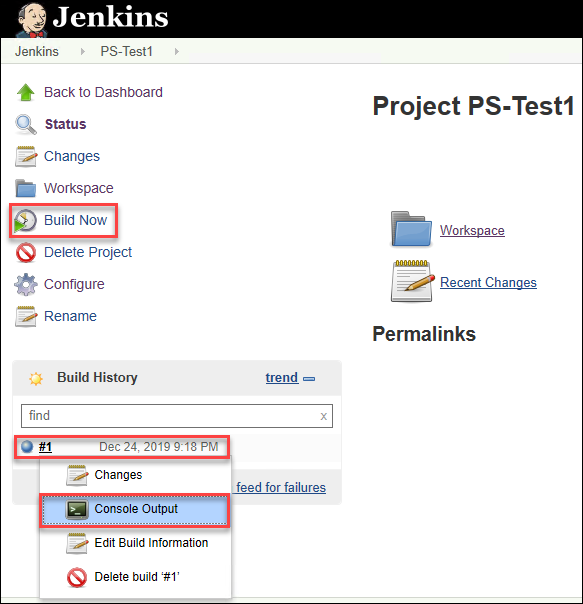
Back in the project created in the previous section, click on the Build Now link. Doing so will trigger the PowerShell script to run.
Once the execution is completed, you should see under the Build History section, that the build # will be available. To view the results of the build, click on the build number, then click on Console Output. Please refer to the screenshot below for guidance.
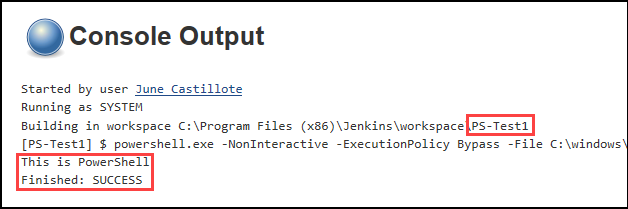
The screenshot below shows what the Console Output would be while the PowerShell script is running.
Remember from the previous section, the code you used displays "This is PowerShell" as output. Looking at the screenshot below, you see that the intended string is displayed and that that status of the build is Success.
Checking the PowerShell Plugin's Bitness
You now have an idea on how to get started running PowerShell scripts with Jenkins. You've learned how to create a PowerShell script project and how to test it in the previous section.
It is important to know that the PowerShell plugin can only invoke the 32-bit PowerShell engine. In most cases, the 32-bit PowerShell is enough to run scripts. However, there are some PowerShell modules that require the 64-bit PowerShell engine to run.
For example, the Azure AD PowerShell Module can only be used with 64-bit PowerShell. Assuming that the Azure AD module is installed on your computer, trying to import the module using Import-Module AzureAD in a 32-bit PowerShell session results in the error as you see in the sample screenshot below.

Using the steps you learned in this post so far, create a new PowerShell project in Jenkins and name it Check PowerShell Bitness. Then, in the build, use this script below.
The first line determines the bitness of the current platform. The second line will output the result in the console.
$bitness = ([System.IntPtr]::size * 8)Write-Output "PowerShell is $bitness-bit"Once you've created the project, manually trigger its build and check the result using the Console Output. As you see in the example below, the Check PowerShell Bitness project ran and shows that the PowerShell it invoked is 32-bit.
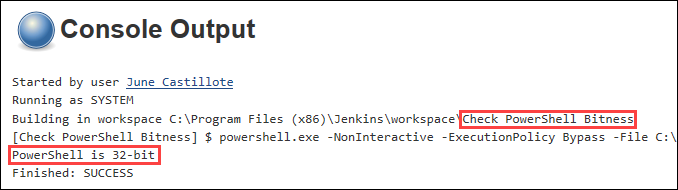
The previous test above confirms that running a PowerShell script in Jenkins uses the 32-bit PowerShell binary.
Invoking 64-Bit PowerShell in Jenkins
There are a few ways to run scripts using 64-bit PowerShell in Jenkins and you will learn about them next.
Method 1: Using Invoke-Command (Without Credential)
Using the Invoke-Command cmdlet to run a script calls the 64-bit PowerShell binary, and it can be used to execute scripts in 64-bit PowerShell. Also, this cmdlet can be used with or without a credential.
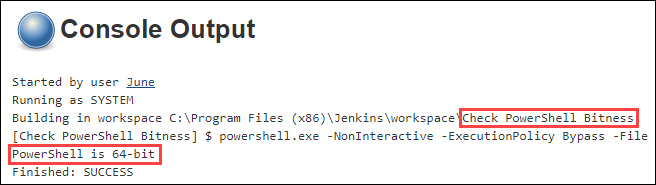
Using the same Check PowerShell Bitness project created in the previous section, edit the script and replace it with this code below. This code targets the local computer to execute the script block.
Invoke-Command -ComputerName $env:COMPUTERNAME -ScriptBlock {
    $bitness = ([System.IntPtr]::size * 8)
    Write-Output "PowerShell is $bitness-bit"
}
Once you've saved the script, manually trigger a build again. Looking at the example console output below, this time the script is run with 64-bit PowerShell.
Method 2: Storing and Using Credentials in Jenkins (Invoke-Command)
In this method, credentials can be stored in Jenkins and used with the Invoke-Command cmdlet. One situation where this method can be considered is when authentication is required to run remote script executions.
The credential must have enough access to the computer that is targeted by the script.
Jenkins has a built-in Credentials plugin. This allows for storing encrypted credentials that can be called inside PowerShell scripts as environment variables (eg. $Env:credential).
To start storing a new credential in Jenkins, from the Jenkins dashboard, click on Credentials —> System —> Global credentials.
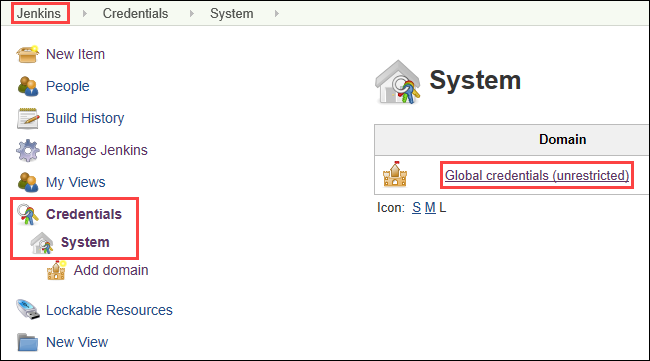
Inside the Global credentials page, click on Add Credentials. Next, fill in the username, password, id, and description boxes. Lastly, click Save.

Using Credentials in Jenkins
Now that the credential is stored, it is ready to be called in a PowerShell script.
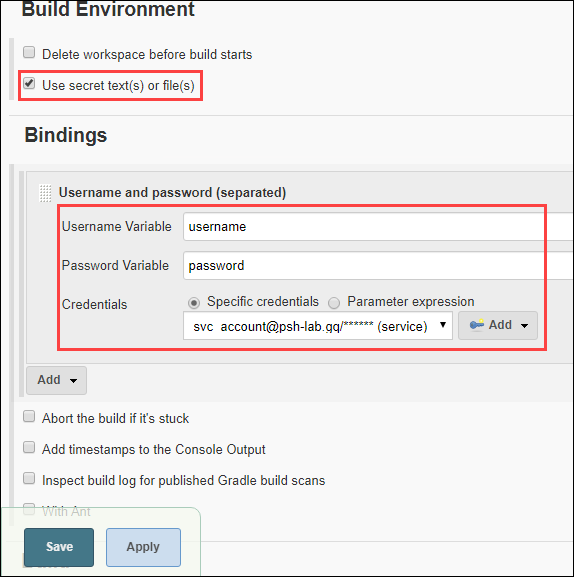
Using the same Check PowerShell Bitness project created in the previous section, click Configure and go to the go to the Build Environment section. Put a check on Use secret text(s) of file(s) checkbox.
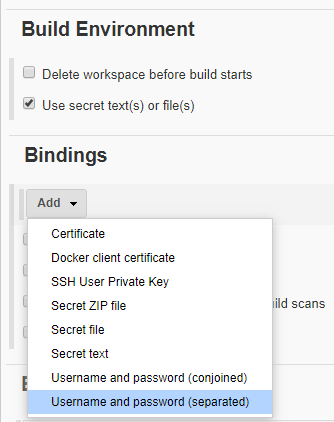
Under Bindings, click Add and select Username and password (separated) from the list.
Then, in the Username Variable box, type in username, and type in password in the Password Variable box. Select Specific credentials. These two boxes mean that the credential's username and password will be created as environment variables available to the PowerShell script at runtime. Make sure that the correct credential is selected.
Next, scroll down to the Build section and edit the script. You'll see in the code that the two environment variables are used, namely $env:username and $env:password. You'll learn more about what each line of code will do by referring to the comments above each line.
Replace the code in Jenkins with the code below, then click on Save.
# Convert password to secured string
$secPassword = ConvertTo-SecureString ($env:password) -AsPlainText -Force
Create the credential onject
$credential = New-Object System.Management.Automation.PSCredential ($env:username, $secPassword)
Invoke the command passing the credential object
Invoke-Command -computername ($env:COMPUTERNAME) -credential $credential -scriptblock {
    $bitness = ([System.IntPtr]::size * 8)
    Write-Output "PowerShell is $bitness-bit"
}
Once saved, manually trigger a build again and inspect the console output. The result should show you that PowerShell is running as 64-bit.
Method 3: Using the Sysnative PowerShell
Another method to execute 64-bit PowerShell scripts in Jenkins is by calling the script using the PowerShell binary in the %WINDIR%\Sysnative folder. You can learn about this folder by following this link - Sysnative folder in Windows 64-bit explained
In a nutshell, Sysnative is a redirection folder that allows 32-bit programs to call 64-bit programs.
Using the same Check PowerShell Bitness project created in the previous section, edit the script and replace it with the code below. The first command creates a new alias for the powershell.exe binary in the Sysnative folder. And the second command uses the PS64 alias to run the code inside the script block.
# Create an alias for the PowerShell.exe binary in the Sysnative folder
Set-Alias -Name PS64 -Value "$env:WINDIR\sysnative\windowspowershell\v1.0\powershell.exe"
Run the script on the local machine using the Sysnative PowerShell.exe redirector.
PS64 {
    $bitness = ([System.IntPtr]::size * 8)
    Write-Output "PowerShell is $bitness-bit"
}
Summary
In this article, you've learned about a few different methods to execute 64-bit PowerShell scripts in Jenkins. These methods include using the Invoke-Command cmdlet with and without credentials and using the Sysnative file system redirector.
In the end, your choice of which method to use will depend on your implementation. There may be other ways to achieve this goal that was not covered in this post. So keep experimenting and I hope that this post will help you get started with running 64-bit PowerShell scripts and modules in Jenkins.