Power Automate & SharePoint Privileged Access Management

This article was written by Jerome Liwanag. He is a frequent contributor to the Adam the Automator (ATA) blog. If you'd like to read more from this author, check out his ATA author page. Be sure to also check out more how-to posts on cloud computing, system administration, IT, and DevOps on adamtheautomator.com!
Did you get an IT audit and was told you have too many super users in your Active Directory domain? Or perhaps you have read a recent breach and they were talking about limiting admin access when not in use? You need to start paying attention to Power Automate and SharePoint privileged access management.
There are many solutions available to manage high-privilege accounts like Microsoft Identity Manager (MIM), for example. Commercial tools are good solutions but implementing them can be complicated and will incur some costs.
In this article, you're going to learn a quick way of managing high-privilege accounts using tools you probably already have in your environment. It will allow you and your peers to practice privileged account management (PAM) on the cheap to get the job done.
This solution the guide will cover will manage the requirement of temporary elevated access of various resources controlled by AD groups. For example, perhaps an engineer needs the same privileges that a member of the Domain Admins group needs. You could just add that engineer's account to the Domain Admins group which solves the problem but the engineer only needs those rights temporarily.
You might think you'll remember to remove that account but you probably won't. You need an automated way to not only remove privileges from that account but also to request and approve that request in the first place. That's the problem you're going to learn how to solve in this guide.
Prerequisites
This article is going to be a walkthrough. To follow along the guide, you will need the following prerequisites.
- A Microsoft/Office 365 E1 and above subscription with the following:
- SharePoint Online (SPO)
- Microsoft Power Automate (aka Flow)
- Active Directory (AD)
- Azure AD syncing with your on-prem AD environment
- The AzureAD PowerShell module
- A group managed service account (gMSA) - This article will assume you have a gMSA created called gMSA_PAM.
- The RSAT-AD-PowerShell (ActiveDirectory) PowerShell module
- An AD-joined Windows 10 or Windows Server 2019 machine
- All scripts for this tutorial downloaded and extracted. This guide will assume that you saved them in C:\Temp.
Project Overview
This guide is going to be a walkthrough to build an end-to-end, privileged access management temporary access approval workflow using SharePoint as the self-service form, Power Automate to automate the approval process, and Azure AD to authorize the change.
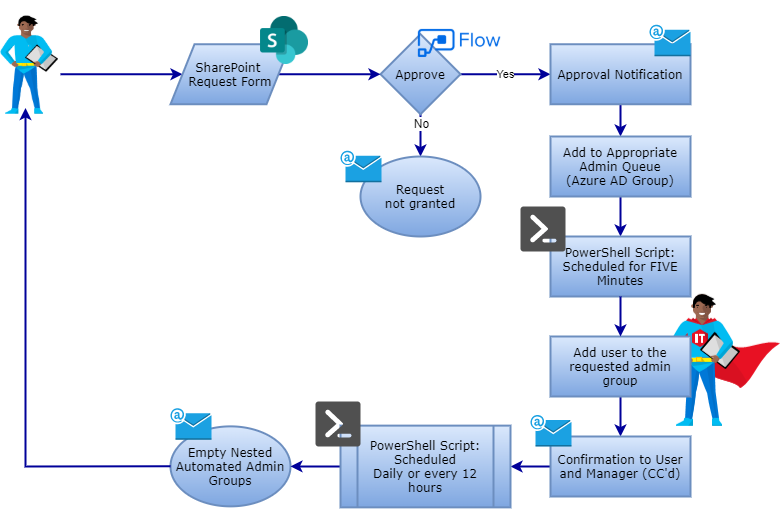
If you need more specifics, refer to the below steps and flowchart for a workflow representation of how this solution is built.
- A user submits their request by filling out a SharePoint List.
- Power Automate will be triggered from this submission and email all defined approvers containing the request details.
- The requestor then gets notified of the status of their request once approved or denied.
- Once approved, the user is then added to a temporary Active Directory security group that is nested underneath a group with the appropriate privileges.
- A scheduled PowerShell script that runs every five minutes adds the user to a nested group, effectively elevating their access based on the requested role.
- PowerShell sends an email to the user and their manager confirming the group membership addition.
- After a scheduled time, a separate PowerShell script removes the user account from the nested group essentially revoking their elevated access.
- Lastly, the script notifies the end user that their elevated access has been revoked.
Below you can sea visual representation of the steps above.
Preparing the Active Directory Groups for Power Automate
Before you begin building this privileged access management solution, you need to first set up a few things in Azure AD. First, you'll need to create a couple of Azure AD security groups that represent the level of access you'd like to give to a requestor. Think of these groups as holding the same privileges as the actual AD groups like Domain Admins. Instead, you'll create Automated Domain Admins and so on.
These "placeholder" groups will exist to temporarily place accounts that will inherit all privileges of their parent groups like Domain Admins, Enterprise Admins, etc.
Go ahead and create three AD security groups representing whatever default group privileges you'd like requestors to have access to. In this guide, you're creating placeholders groups for Domain Admins, Enterprise Admins and Schema Admins. You are free to create these groups in any way you'd like but below you'll find a PowerShell snippet that will expedite this process.
Be sure to replace DC=contoso,DC=com with your domain.
#Define the OU Path of the groups, where you want them saved
$path =  "OU=MySecurityGroups,DC=contoso,DC=com"
#Group which need to be created
$groupNames = "Automated Domain Admins","Automated Enterprise Admins","Automated Schema Admins"
#Lets use ForEach to create the groups
foreach ($name in $groupNames) {
  New-ADGroup -Path $path -Name $name -GroupCategory Security -GroupScope Global -Description "Used for elevating access temporarily for AD roles"
}
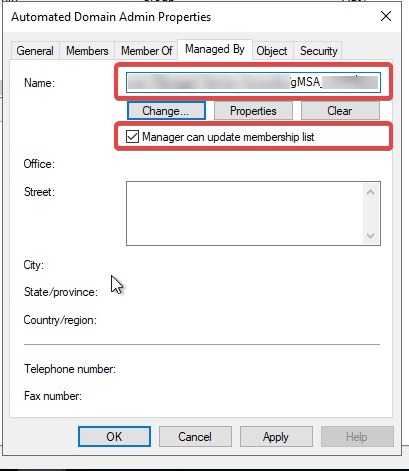
Once you have the groups created, ensure the gMSA account you have created for this guide (defined in the prerequisites section) has delegated access or Manager to the groups that were just created. If not, the automation will not have access to add or remove accounts from the groups. You can see a screenshot of what your gMSA should look like below.
Preparing Azure AD
Once you have all of the placeholder groups created, it's time to prepare your Azure AD environment.
Creating an Azure AD User for Power Automate
Power Automate needs a way to authenticate to Azure AD to manage the placeholder group memberships and the SharePoint site. You need to create an Azure AD user for Power Automate. To do that, use the below PowerShell code snippet.
The code snippet creates an Azure AD user called Service Account - PAM with an email address/UPN of ServiceAccount-PAM@contoso.onmicrosoft.com.
#Prompt for your Azure AD / Office 365 Admin credentials, then connect to AzureAD
$Creds = Get-Credential
Connect-AzureAD -Credential $Creds
#Set the password for the M365 Service Account
$PasswordProfile = New-Object -TypeName Microsoft.Open.AzureAD.Model.PasswordProfile
$PasswordProfile.Password = "PASSWORD-HERE"
#Create the new Azure AD User
New-AzureADUser -DisplayName "Service Account – PAM" -PasswordProfile $PasswordProfile -UserPrincipalName "[ServiceAccount-PAM@contoso.onmicrosoft.com" -AccountEnabled $true -MailNickName "ServiceAccount-PAM@contoso.onmicrosoft.com"
Creating the Azure AD Groups for Privileged Access Management
You've already created the on-prem AD groups and now it's time to create the Azure AD groups for privileged access management. These groups will temporarily hold the approved accounts before syncing them to the local nested AD groups.
Go ahead and create three Azure AD groups corresponding to the on-prem AD groups created earlier called Security Group - Pending Domain Admin Accounts, Security Group - Pending Enterprise Admin Accounts and Security Group - Pending Schema Admin Accounts.
Run the following PowerShell code snippet to take care of creating the groups for you. This PowerShell script also sets the Azure AD user account created earlier as Owner.
#Prompt for your Azure AD / Office 365 Admin credentials, then connect to AzureAD
$Creds = Get-Credential
Connect-AzureAD -Credential $Creds
#Specify the Service Account you created from the previous step
$ServiceAccount = Get-AzureADUser -SearchString "ServiceAccount-PAM"
#Specify groups which need to be created
  $groupNames = "Security Group - Pending Domain Admin Accounts","Security Group - Pending Enterprise Admin Accounts","Security Group - Pending Schema Admin Accounts"
#Lets use ForEach to create the groups
  foreach ($name in $groupNames) {
#Create the new security group
$AADGroup = New-AzureADGroup -DisplayName $name -MailEnabled $false -SecurityEnabled $true -MailNickName "NotSet" -Description "Used for elevating access temporarily for AD roles"
#Add the group owner
Add-AzureADGroupOwner -ObjectId $AADGroup.ObjectID -RefObjectId $ServiceAccount.ObjectID
#Confirm action so you can record the ObjectID as well
Get-AzureADGroup -ObjectId $AADGroup.ObjectID | Select ObjectID,DisplayName
  }
If all goes well, you should see one object returned for each created user.

IMPORTANT: Take note of the Object IDs in the above screenshot, as shown after you ran the script – you will need them for them in the Power Automate Flow section. If you missed them, you can always find them at the Azure AD portal under the Group section.
All of the preparation is done, it's time to create our solution!
Creating the SharePoint Site
Once you have the groups and user account all set up, you now need to build a front-end for a requestor to request temporary privileged access management access. In this guide, we're using a SharePoint site; more specifically, a SharePoint List. This SharePoint site is where you will direct requestors to request access.
If you already have a SharePoint Site you'd like to use, feel free to skip to Importing the SharePoint List section. However, be warned that all future steps in this guide will assume you're using the SharePoint site built in this section.
- First, log in to your SharePoint Admin Center (typically at htps://YourO365Tenant-admin.sharepoint.com).
- Once you are logged in, click on Site Collections —> New —> Private Site Collection.
- Now set the following attributes in the screenshot below to set up the new SharePoint site.
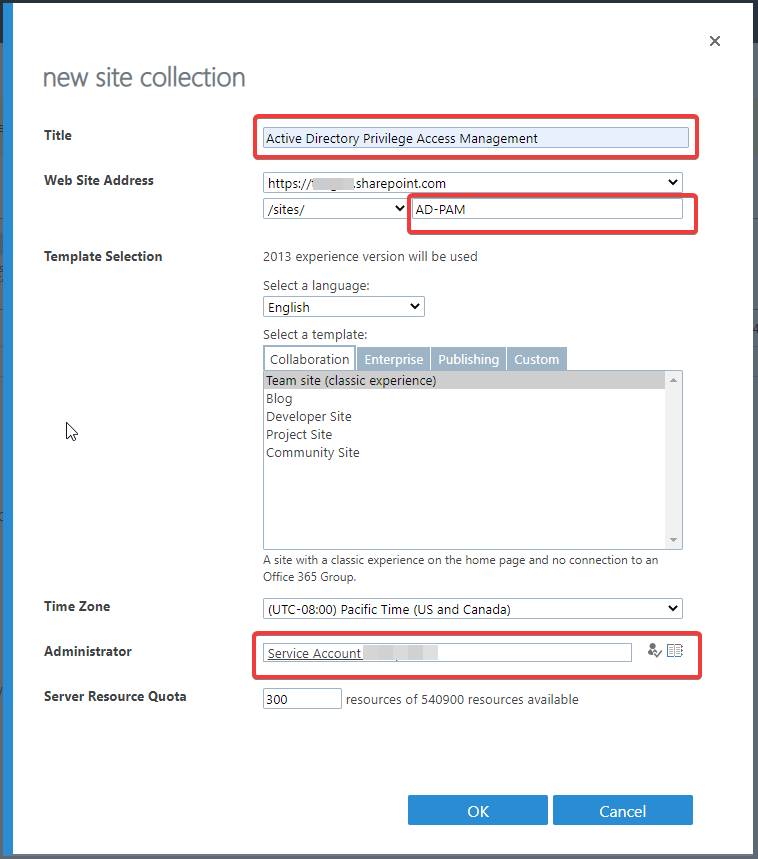
4. Click OK then wait for the SharePoint site to provision. Once the
SharePoint site provisioned, you're then ready to import the SharePoint List.
Importing the SharePoint List
Once the SharePoint site is created, you'll then need to create a SharePoint List for privileged access management. The SharePoint List will store all of the requests and to show the details of each request. Follow the following steps to create the SharePoint List.
- Open the SharePoint site you are using for the front-end previously created at the URL https://contoso.sharepoint.com/sites/AD-PAM.
- On the SharePoint site, click the gear or settings icon on the top right corner and click Site Contents —> Site Settings.
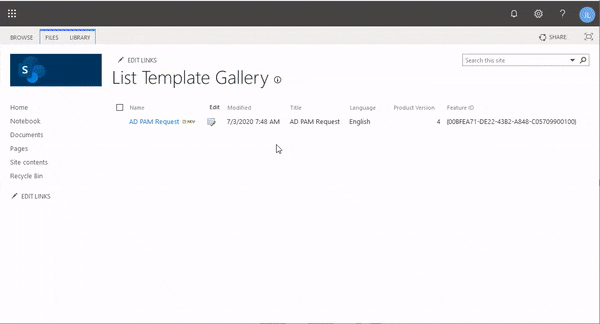
- Under Web Designer Galleries, click List Templates and then on File —> Upload.
- In the Upload dialog box, upload the SharePoint List template (AD Admin PAM.stp) in this guide's GitHub repo.
- After uploading the file, click the gear icon again and go back to Site Contents.
- Once on the Site Contents page, click New —> App. On the Your Apps page: type "AD" on the search box and click AD Admin.
- Name the SharePoint List (i.e. AD Admin Request) then click Create. You have now added the SharePoint list!
If you need visual instruction on the steps above, check out the process below.
 SharePoint Online New List from Template
Be sure to note the URL since this is where your admins will request their AD Admin access (i.e contoso.sharepoint.com/sites/AD-PAM).
Setting up Microsoft Power Automate for Privileged Access Management
You've now got through all of the boring set up work; the real magic starts here, setting up Power Automate to automate the whole privileged access management process!
Did you know you can approve requests sent via Power Automate in Outlook or the Power Automate app on your mobile phone?
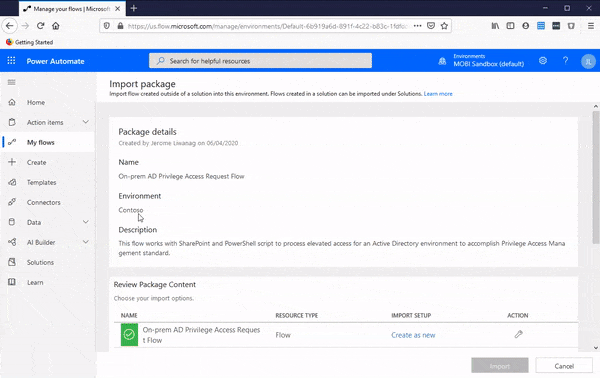
To make the process of setting up Power Automate as easy as possible, you have a Power Automate template file in the associated GitHub repo files called On-premADPrivilegeAccessRequestFlow.zip. The first step in setting up Power Automate is to upload the template which will create the Power Automate flow.
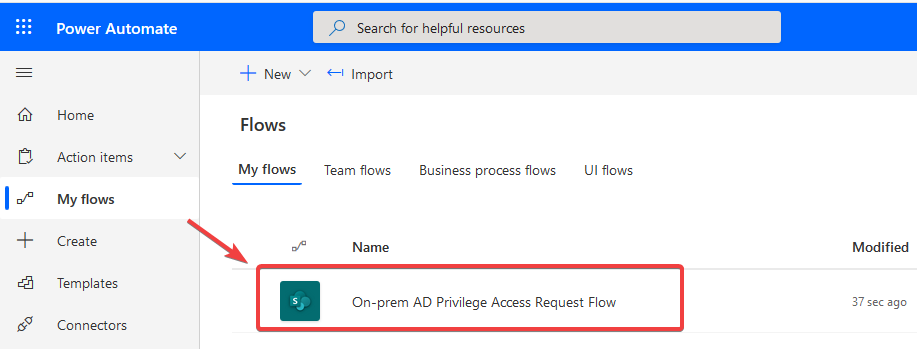
- Login to Power Automate.
- Click on My Flows.
- On the My Flows page, click Import.

- Locate and upload the Power Automate Flow template file from the GitHub repo files called On-premADPrivilegeAccessRequestFlow.zip.
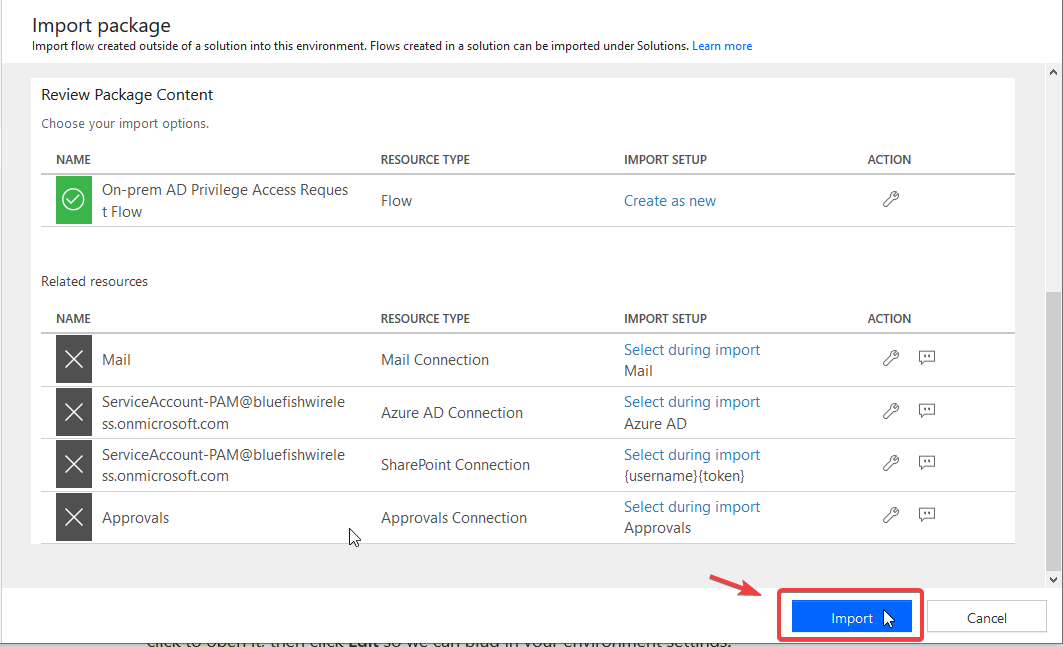
- After uploading, it is time to set up the connections. Click Select during import. If you haven't setup previous Mail connection using Power Automate, it will show blank as shown in the GIF below.
- To create a new Mail connection, click Create new and you will see a new window to configure the connection.
- Click New Connection, scroll through the list, and look for Mail.
- When you find the Mail connection, click on it and then on Accept and create as shown below.
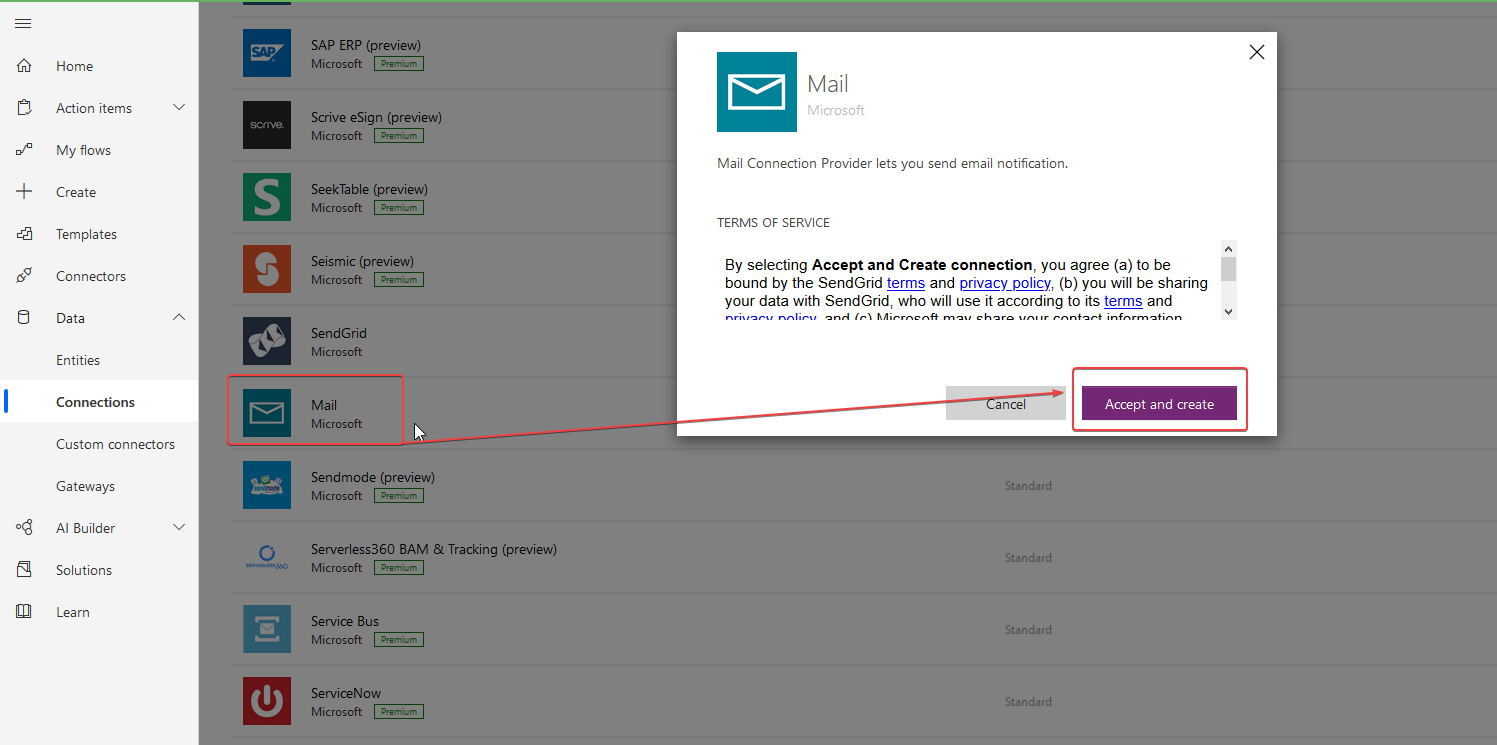
If you'd like a visual representation of the above steps, check out the animated GIF below.
9. Now repeat steps 5-8, for each connection type defined in the template; Azure AD, SharePoint, and Approvals connecting each of your connections with the template.
10. After you configured each connection, click Import at the bottom of the page as seen in the following screenshot.
12. Click on On-prem AD Privilege Access Request Flow to open the flow.
13. Click Edit to configure your environment settings.
Configuring Power Automate and SharePoint Environment Settings
Once you've imported the template and set up the connections, you now need to link the SharePoint site and Azure AD user created earlier to the Power Automate flow to continue building this privileged access management project. To do that:
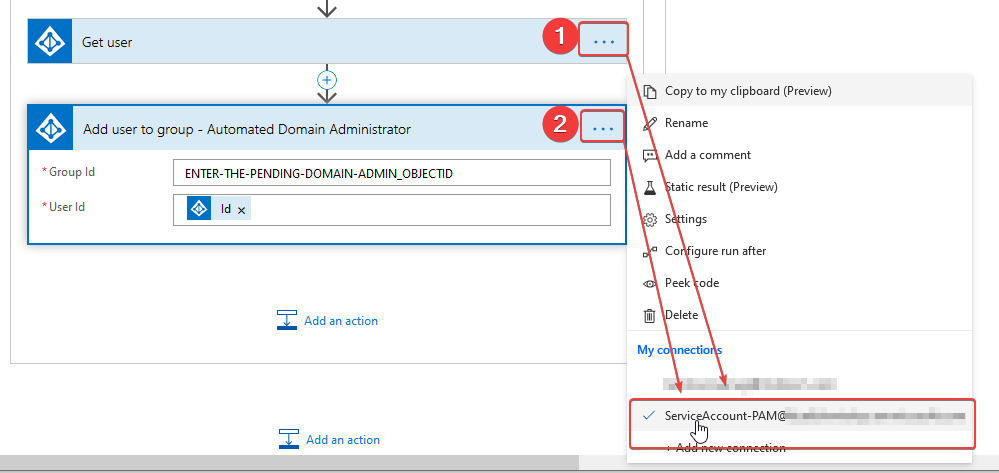
- Confirm your Azure AD service account (ServiceAccount-PAM) is being used under My connections labeled #1 and #2 in the screenshot below.
- Provide the SharePoint site and list created earlier as a URL under When a new item is created action (#3 in the screenshot.
- Confirm your Azure AD service account (ServiceAccount-PAM) by clicking on the ellipses in Get file metadata action (#4 in the screenshot) and then providing the SharePoint site URL again as labeled #5 below.
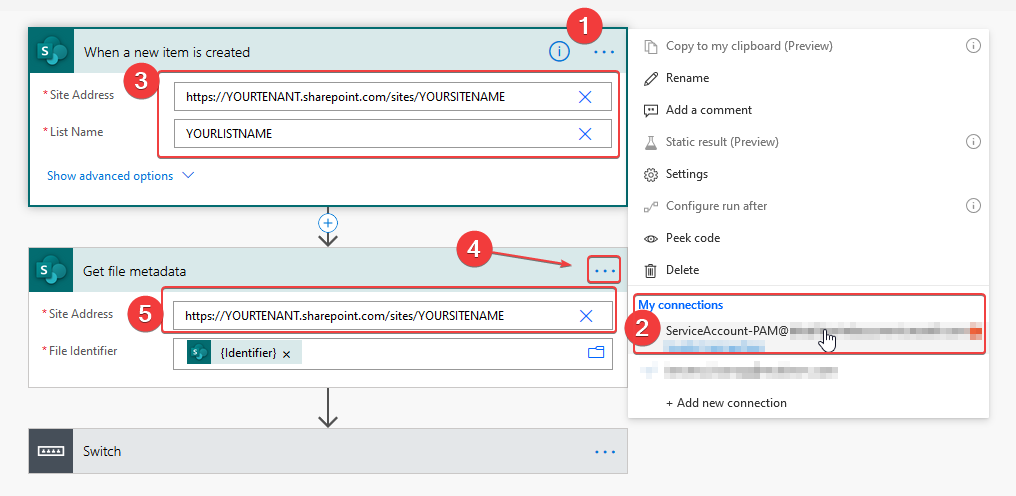
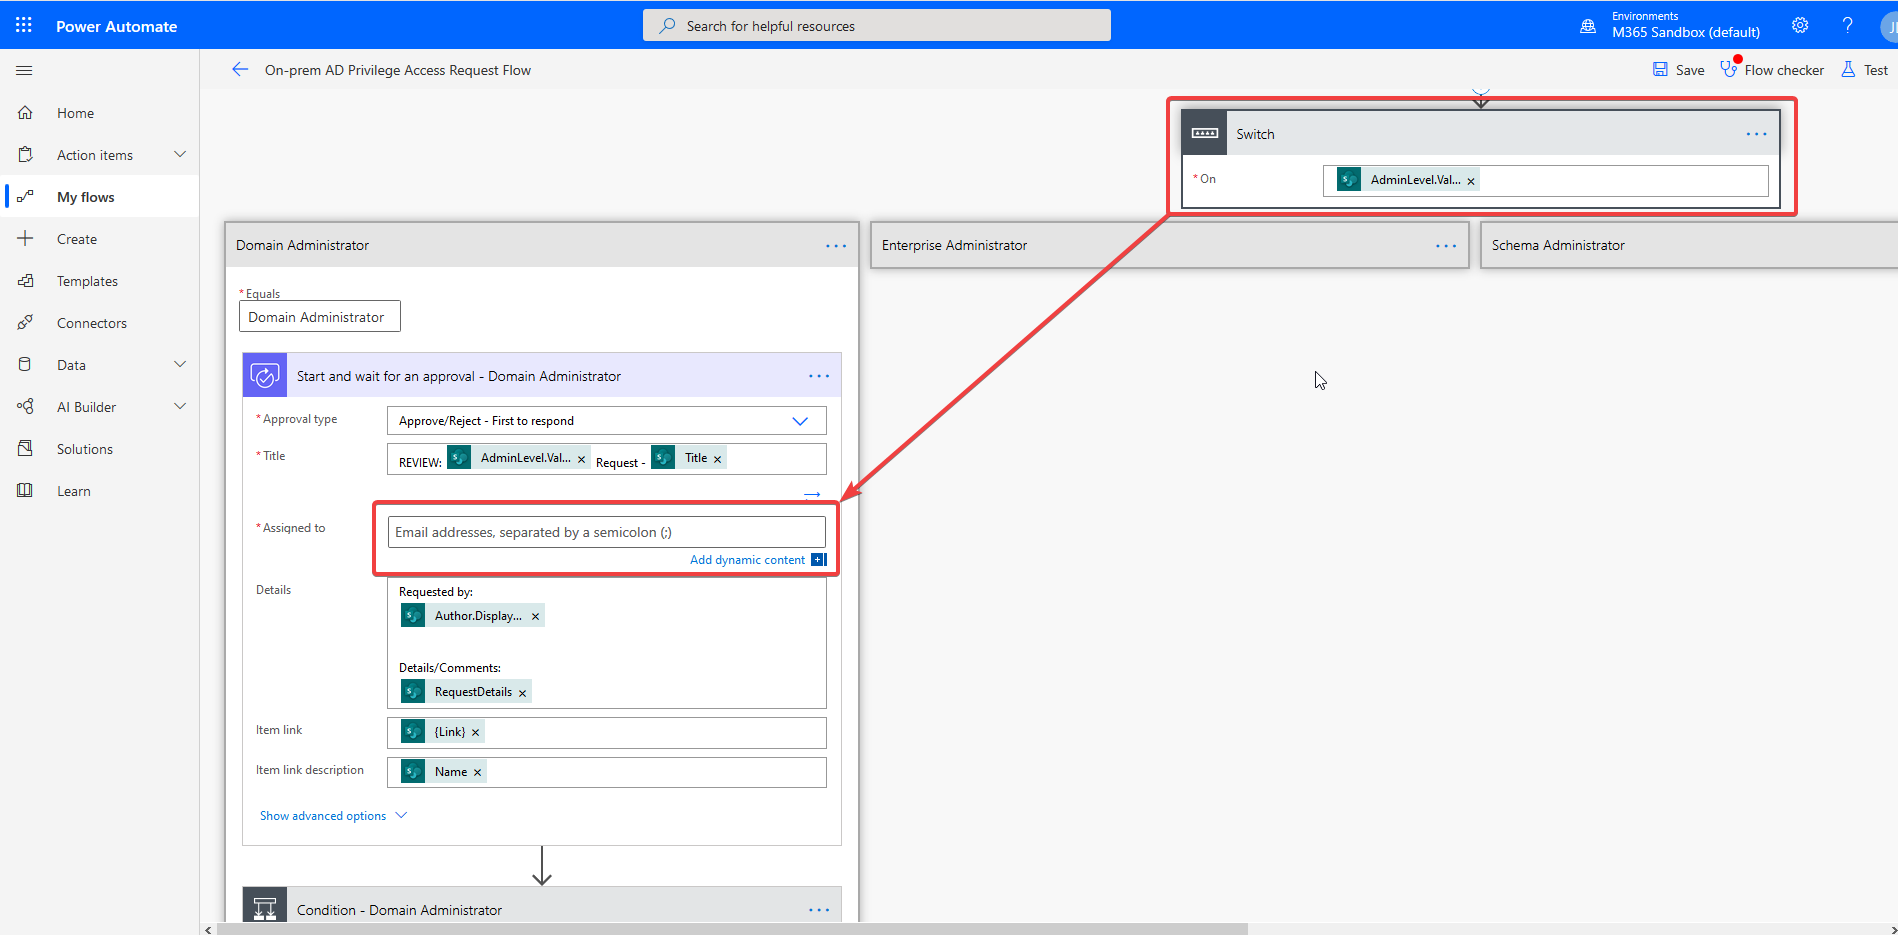
- Click on the Switch action as shown above.
- Click on the Domain Administrator item.
- Click the Start and wait for approval process and set your approval template and approvers as shown below.
NOTE: It is a good idea that you have approvers that covers the full shift or 24/7. You never know when someone would need elevated admin roles.
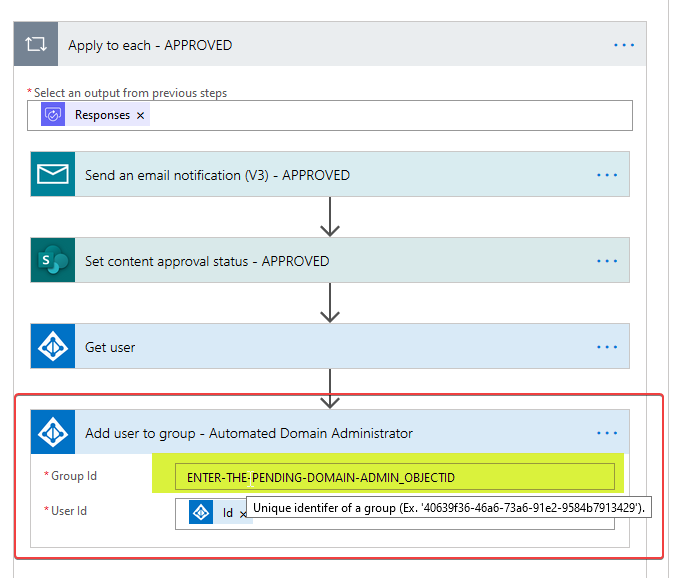
7. Click on the Condition branch.
8. Expand the Yes section flow. This is the section where you can set up your email template notification if approved. More importantly, it is where you will set the Object ID of the Security Group - Pending Domain Administrator Azure AD group.
Ensure the Add user to group - Automated Domain Administrator section looks like the below screenshot.
9. Confirm the Azure AD service account is selected again as your connector as shown in the following screenshot.
Testing the Power Automate and SharePoint Privileged Access Management Flow
You now have everything set up and ready to go. It's time to test this Power Automate and SharePoint privileged access management project! The test will confirm the functionality of the request and approval section of the solution without actually doing any actions.
This will be a good time to review the email templates in the previous steps within the Flow section to confirm it is what you would like to use.
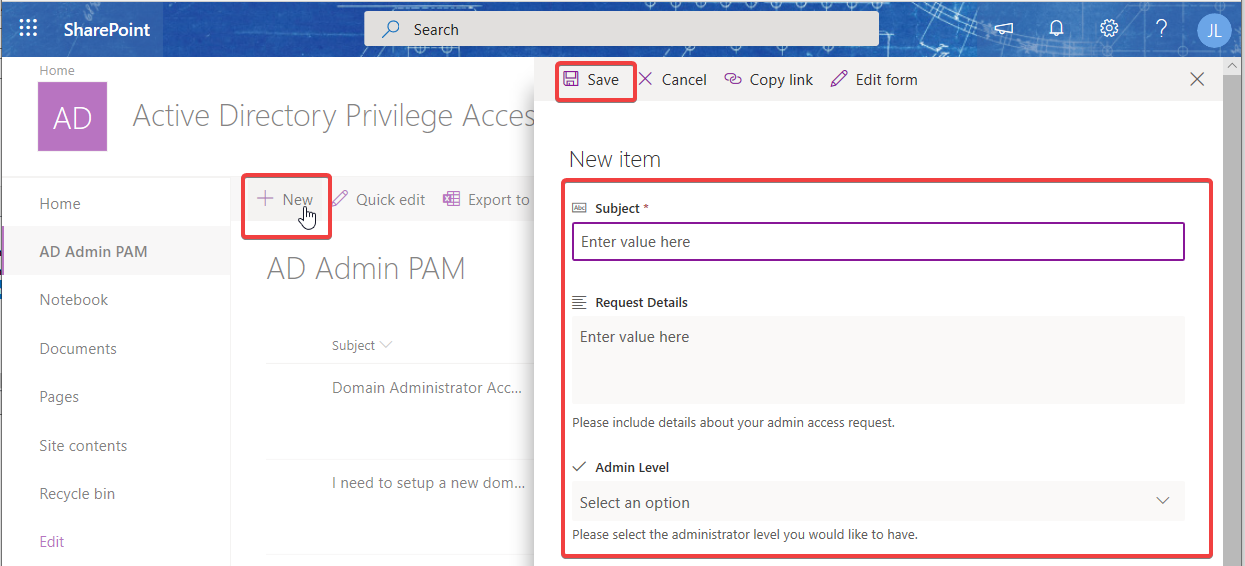
- Open the SharePoint site you are using for the front-end previously created at the URL https://contoso.sharepoint.com/sites/AD-PAM.
- Click New, then fill out the form fields and click Save as seen on the screenshot below.
3. Here's a screenshot when it is all working in SharePoint and PowerAutomate.
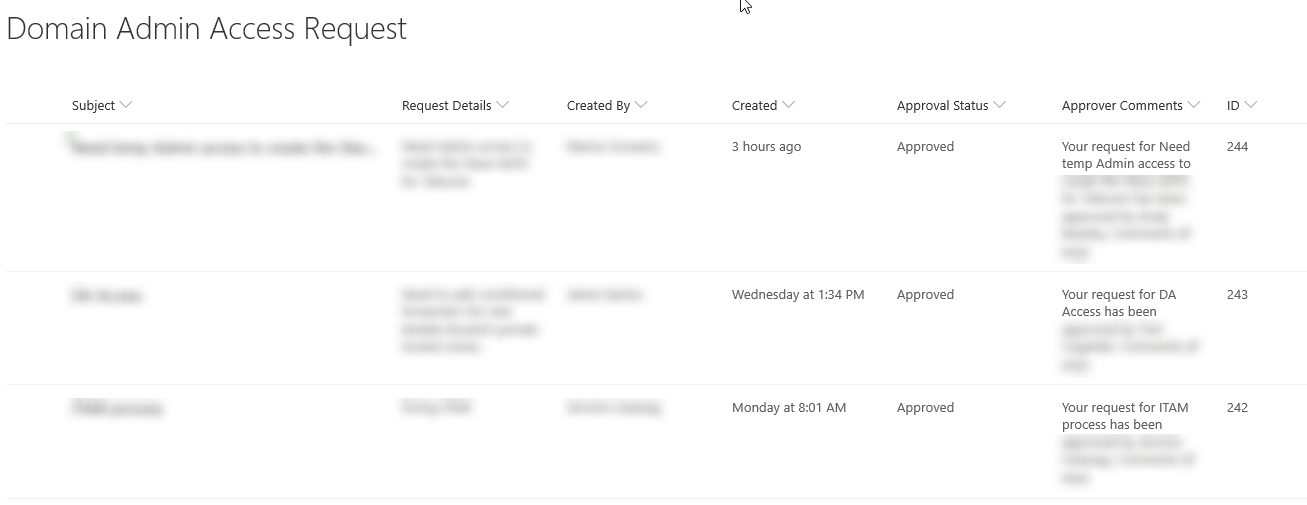
 Power Automate Screenshot - processed request.
Once you are satisfied with the flow and email templates, move on to the next section to configure and schedule the PowerShell scripts!
Setting up the PowerShell Script
Now that you have the "request and approval" process going, it is time to schedule the "actions".
- Pick an AD-joined server or PC to run the PowerShell scripts runs. It doesn't matter where they run but you do need to ensure this machine will be up 24/7 as it will be scheduled to run on a frequent basis.
- Go to your server or workstation where the script will be hosted and first confirm it is able to connect to a domain controller via PowerShell. If you have not set this up before, follow this great article by Stuart Squibb.
- Open up the AD-PAM-Add-Admins.ps1 script found in the GitHub repo. This script will be the one that adds the user to the nested group essentially elevating the access of the user.
- Review the
Script Variablessection as indicated below. Set your environment variables as well the as the Azure AD service account credentials to be used.
####################
Script Variables
####################
#Email Settings
  $SMTPServer = "contoso-com.mail.protection.outlook.com" #DirectSend or your mail relay server.
  $FromEmail = "IT@contoso.com"
#Group Information
  $hashArr = @(
    @{
    AADSecurityGroupObjectID = 'OBJECT-ID-OF-YOUR-AAD-GROUP'  #Object ID of your Azure AD Group
    NestedADSecurityGroupName = 'Automated Domain Admins'     #The name you use or called your destination / local AD security groups
    ElevatedAdminGroupName = 'Domain Admins'                  #This is just use for the email body
    },
    @{
    AADSecurityGroupObjectID = 'OBJECT-ID-OF-YOUR-AAD-GROUP'
    NestedADSecurityGroupName = 'Automated Enterprise Admins'
    ElevatedAdminGroupName = 'Enterprise Admins'
    },
    @{
    AADSecurityGroupObjectID = 'OBJECT-ID-OF-YOUR-AAD-GROUP'
    NestedADSecurityGroupName = 'Automated Schema Admins'
    ElevatedAdminGroupName = 'Schema Admins'
    }
)
5. Open up the second script called AD-PAM-Clear-AdminGroups.ps1. This script will clear the members of the nested group, effectively removing the elevated access.
6. Review the Script Variables section as indicated below and set your environment variables.
####################
Script Variables
####################
#Email Settings
  $SMTPServer = "contoso-com.mail.protection.outlook.com" #DirectSend or your mail relay server.
  $FromEmail = "IT@contoso.com"
If you used the CSV to add, you can reference it hear a well and use the same CSV source, since we only have 3, I've specificed them here instead of creating another file.
$NestedADSecurityGroupNames = "Automated Enterprise Admins", "Automated Schema Admins", "Automated Domain Admins"
Scheduling the Group Checks
Now that you've prepared the script to run within your environment, it is time to move to the next section and use Task Scheduler to set the script to run.
The first script will need to constantly check if someone has been added to the pending Azure AD security groups. These groups will hold the approved users temporarily. If they have a member, then it will run the script and add those members to the nested admin groups, like Domain Admins, effectively elevating the user account.
To set up the scheduled task:
- Open Task Scheduler
- Click Create a Task and name it AD-PAM Add Admins with a description.
- Go to the Trigger tab and click New.
- Select Daily (set your preferred start time)
- Check Repeat task every: 5 Minutes. Click OK.
- Go the the Actions tab, click New
- Type powershell.exe for the Program/Script.
- Set the Add arguments box to -File "C:\YourScriptDirectory\AD-PAM-Add-Admins.ps1". This points PowerShell to the script covered earlier.
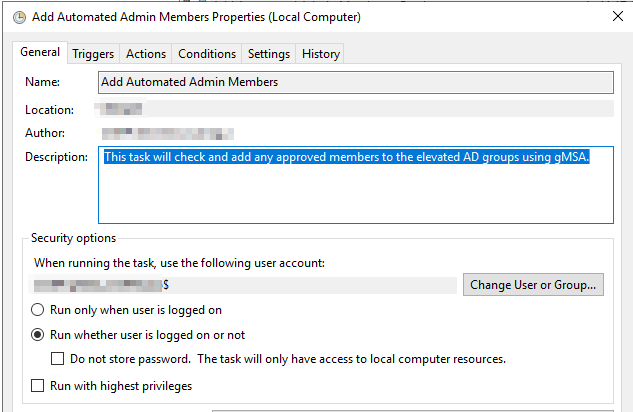
- Go back to General tab and click on the Change User or Group button.
- Choose the gMSA service account option making sure to select Run whether user is logged in or not.
- Click OK to exit
Scheduling to Clear the Elevated Group Members
Now you are ready for the last step! You have set the script to add the user to the nested admin groups, next you are going to schedule when to clear them out of the group to revoke the elevated access.
This scheduled task needs to run daily, ideally when work is over. You can also schedule it twice a day at 7 AM and 7 PM if you'd like. That would mean admins can only have elevated access for a maximum of 12 hours. This is the time a script will run to actually remove the elevated roles from the user, effectively demoting their user accounts with no special permissions.
To create the scheduled task, follow the same procedure as you did to create the scheduled task for the other script. Although this time, you can modify the daily trigger if you'd like to twice a day. Also, be sure to change the arguments to point to the path of the other script named AD-PAM-Clear-AdminGroups.ps1.
Testing out the Privileged Access Management Process
You're all set! Go ahead and give it a shot to test the process by submitting a request through the SharePoint site you created earlier (i.e. https://contoso.sharepoint.com/sites/AD-PAM), which Power Automate will act on. To run through a test, check out the below video.
Overview of User Experience and Sample EmailsIf all was configured correctly, you should see the following happen:
- Approver(s) will receive an email to approve the request.
- Requester will get a notification of approval (or denial).
- If approved, a confirmation email to the requester, with their manager copied.
- Then you should be able to perform elevated task using the role requested!
- Depending on the schedule of the last script - you'll get a confirmation when it revokes your access as an admin.
Summary
Going through this guide, you learned how to utilize Microsoft Power Automate, SharePoint and PowerShell to perform an elevated access approval process for a local Active Directory environment. Using the same concepts you used for the three initial groups, you can add additional groups like DNSAdmins, maybe even Local Admins Groups or a group that has access to sensitive files!
There you have it - a simple way of adhering to IT best practices by setting up an elevated access approval for super admin groups in your Active Directory environment. By doing this process, you have made your environment a little safer, especially if an admin account was somehow compromised.


