Export-CliXml and Import-CliXml: Saving Objects to XML

This article was written by June Castillote. He is a frequent contributor to the Adam the Automator (ATA) blog. If you'd like to read more from this author, check out his ATA author page. Be sure to also check out more how-to posts on cloud computing, system administration, IT, and DevOps on adamtheautomator.com!
When managing systems with PowerShell, there will always be a time when you'll need to export PowerShell objects to files. There are many ways to export objects to file in PowerShell. One of the easiest ways to do that is by using the Export-CliXml cmdlet.
One file format that works great for exporting PowerShell objects is XML. The XML format supports displaying properties with multiple values and retains the nested levels of object properties. This means that all parent and sub-properties are saved and the object structure remains intact.
Luckily, PowerShell has built-in cmdlets that allow you to save and import XML files. In this article, you will learn about how to use Export-CliXml in PowerShell to export XML files from objects. Also, how to use Import-CliXml in PowerShell to import XML files, too.
Recognizing CliXml: A Special Kind of XML
As their names imply the export-clixml and Import-CliXml PowerShell cmdlets export and import object to and from CliXml files. CliXml is a combination of the acronyms CLI and XML.
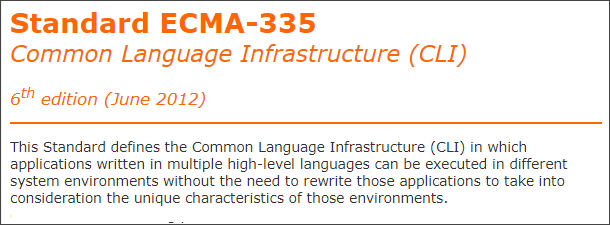
But what is CLI? According to this Ecma published entry:
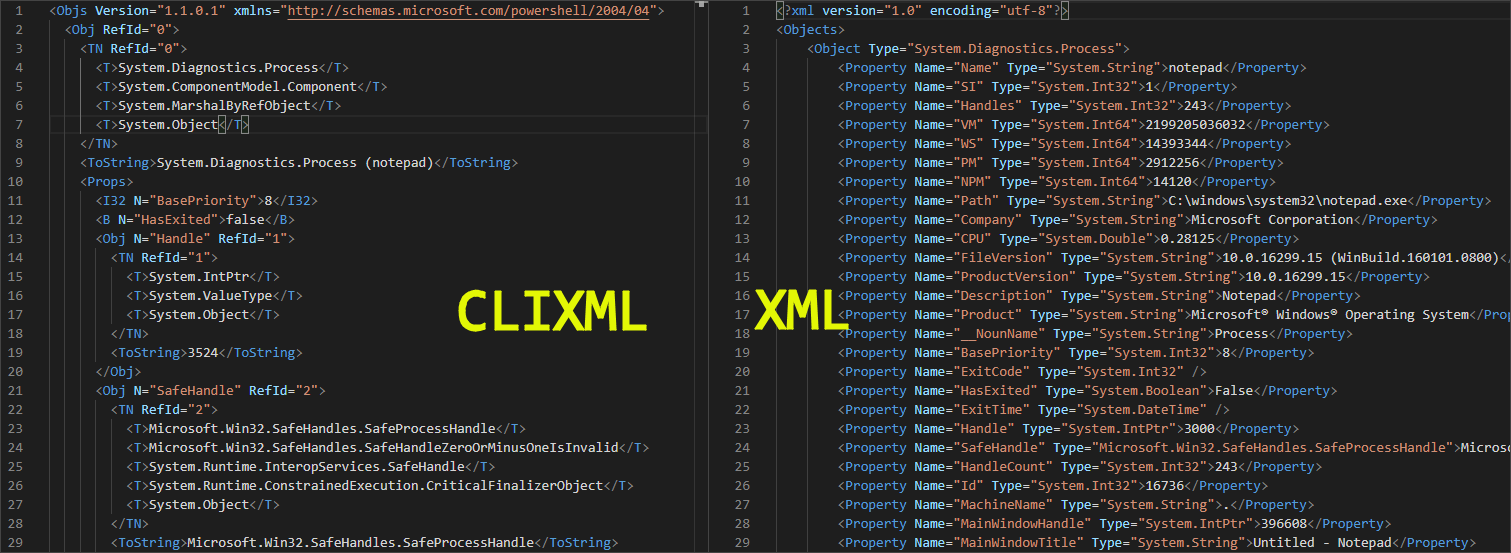
Summarizing the excerpt above, a CLI implementation must be portable and platform agnostic. It is important to remember that CliXml is XML-based only and not interchangeable with a standard XML document. The image below shows the comparison of the CliXML and XML document contents.
Choosing XML over CSV
A CSV file may not always be the right option to store exported information. Instead, you can store information with an XML file. But when would that be appropriate? The decision on whether or not to use XML really depends on how the exported information will be used.
Exporting objects to CSV is popular among administrators because the output can be conveniently viewed and manipulated in Excel. A CSV file is ideal for things like a flat-file report, a list with multiple columns, and an input file for database import, to name a few.
However, as useful as CSV is, it is not ideal for use with nested object properties. Nested object properties can be described as 'objects with properties within properties'. To demonstrate what a nested object property looks like, take a look at the below example.
The code below gets the process named notepad and exports the resulting object to a CSV file called sample.csv.
Get-Process notepad | Export-Csv .\sample.csvOne of the properties returned by the Get-Process command is SafeHandle. The SafeHandle property has nested properties that a CSV file cannot handle by design. And as a result, instead of the actual value of the property, the class name is shown in the sample.csv screenshot below.

Getting the value of the SafeHandle property in PowerShell using this command below shows the nested property values. See the below image as an example.
(Get-Process notepad).SafeHandle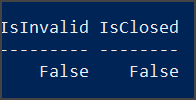
On the other hand, the XML format supports the nested object properties of the exported data. This time, look at the same process object as an XML representation.
The command below gets the object property of the process notepad and creates an XML file called sample.xml containing the property values.
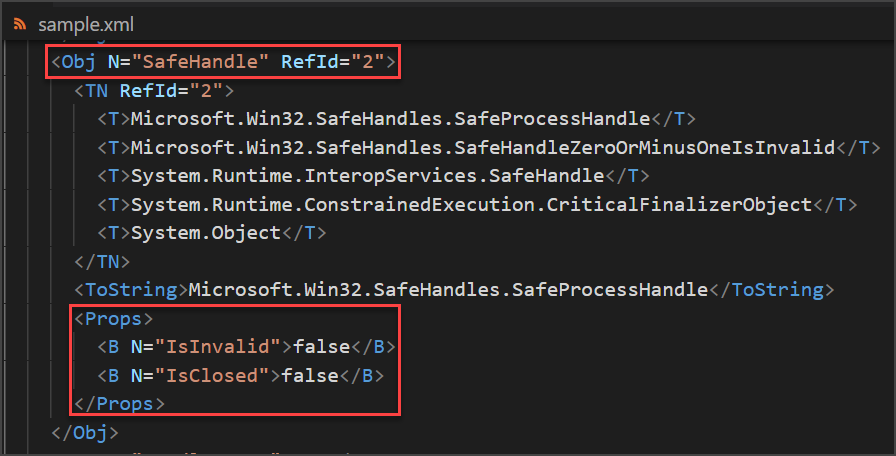
Get-Process notepad | Export-Clixml .\sample.xmlThe example below shows that the SafeHandle property has two nested properties, and each value is exposed as an XML node.
Comparing the CSV and XML results, it is clear that the XML format is the appropriate choice when you want to preserve the structure of the object you are exporting.
Using Export-CliXml and Import-CliXml in the Real World
It is hard to say with certainty how many ways there are of using the *-CLiXml cmdlets. You'll find the following examples are based on real-world use case scenarios. So, let's move on from the what and dive-in to the how, next.
Maintaining Access Control Lists (ACL)
There are legitimate reasons for controlling access to files and/or folders, especially those that are located in a server. A folder could contain confidential data that only a select few should be able to access, perhaps. Using the *-CliXml cmdlets is an excellent way of maintaining folder permissions.
For example, you have a folder named C:\Confidential. And it is your responsibility to ensure that only specific users have the right to access it and that you are notified when the access list changes.
Using the Export-CliXml and Import-CliXml in a script is an excellent way to monitor these changes in the folder access.
To build a script to monitor for changes in a folder's permission, first, create a baseline record of the current folder access permissions. This record serves as your reference to the proper permissions list.
The below command finds the ACL associated with the C:\Confidential folder and exports it to a file called acl.xml.
# Create a baseline of folder access rightsGet-Acl -Path C:\Confidential | Export-CliXml -Path .\acl.xmlNext, your script must import the content of the existing file (acl.xml) into PowerShell. The imported content will be used for comparison with the current ACL. If there are changes in the ACL, your code must revert the ACL by importing the baseline ACL.
# Import the baseline ACL$baselineACL = Import-CliXml -Path .\acl.xml# ===== OPTIONAL start =====# Get current ACL$currentACL = Get-Get-Acl -Path C:\Confidential<# TODO: Run code to compare current and baseline ACL Then send an alert by email or write an entry in the event log#># ===== OPTIONAL end =====# Update ACL if there's a discrepancySet-Acl -Path C:\Confidential -AclObject $baselineACLOr if you prefer to skip the comparison part of the code, use only this one-line below to update the folder's permissions. The code below overwrites the ACL currently on the C:\Confidental folder with the permissions saved in the acl.xml file.
Set-Acl -Path C:\Confidential -AclObject (Import-CliXml -Path .\acl.xml)"Backing Up" an Object
Whether you manage systems or users, performing changes is one part of the job. Whenever making changes to objects, taking a backup of the object is optional but a logical step. This way, if the change needs to be backed out, having a backup to refer to makes the task that much easier.
For example, one common task in the Exchange Server administration front-line is modifying the list of senders who are allowed to send messages to a distribution group. Before making any changes to the list of allowed senders, it is good practice to take a backup of the distribution group object first.
Perhaps you have a group named SALES, and you want to take a backup. The command below creates an XML export by reading the SALES group and saving its properties to an XML file called sales.xml. By passing the object to Export-CliXml, you will see PowerShell saves the object to a file.
Get-DistributionGroup SALES | Export-Clixml -Path .\SALES.xmlPerhaps now you've made changes to the AcceptMessagesOnlyFromSendersOrMembers property of the SALES group. But, what if you accidentally replaced the list, and now it only has one entry in it? This is your typical "oops.." moment. We've all been there.
Since you backed up the original values of the distribution group, you simply need to import the XML backup file and use it to restore the old values. The example code below shows you just how that can be done.
The first command imports the contents of the sales.xml file and stores it in the $SALES_GROUP variable. Then, the second command overwrites the AcceptMessagesOnlyFromSendersOrMembers property of the SALES distribution group with the list saved in the $SALES_GROUP.
# Import the backup XML file into PowerShell
$SALES_GROUP = Import-CliXml -Path .\SALES.xml
Update the SALES distribution group's accepted senders list
Set-DistributionGroup -Identity SALES -AcceptMessagesOnlyFromSendersOrMembers ($SALES_GROUP.AcceptMessagesOnlyFromSendersOrMembers)
When exporting objects to XML files, it is important to remember that the Export-CliXml cmdlet does not "evaluate" how deep the object property nesting goes. If the object to be exported has nested properties that are more than two levels deep, you need to tell the cmdlet how deep it should go.
So be sure to evaluate the object you plan to export to XML with Export-CliXml to know precisely how deep the nesting level goes. And once you've determined the depth, use the -Depth parameter to specify that number when exporting as shown in the sample command below.
Export-CliXml -Path file.xml -Depth 5Saving an Encrypted Credential
If you're into automating recurring processes like monitoring remote machines, for example, you'll eventually come across having to use a service account credential to retrieve information.
For example, you may be monitoring the services of a remote server and a credential is needed to be able to query the remote server's services list. Credentials can be used in automation, but they have to be saved in a file and will be called by your monitoring script.
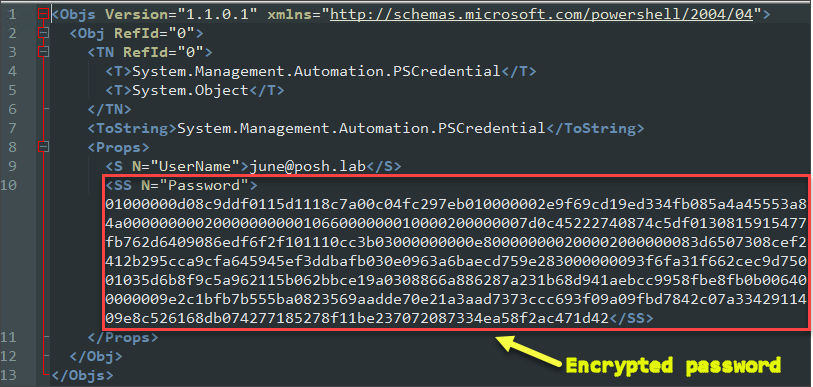
However, saving credentials as plain text is catastrophically wrong. Lucky for us, credential objects can be exported using the Export-CliXml command, and the resulting file will contain the username and the encrypted password.
To export a credential object with Export-CliXml, the code below uses the Get-Credential cmdlet to prompt for the username and password. Then, the credential object is piped to the Export-CliXml to create an XML export file named credential.xml.
Get-Credential | Export-CliXml -Path .\credential.xmlThe exported credential object would look similar to the image shown below.
You should now have an XML file containing the credential called credential.xml, and now it can be used securely in a script. First, to make the credential usable, it must be imported into PowerShell. The code below imports the contents of the credential.xml file and stores it to the $cred variable.
$cred = Import-CliXml -Path .\credential.xmlNOTE: The encrypted credential can only be imported on the same computer using the same account that exported it. Copying the XML file to another machine and importing the credential will not work.
This behavior is a password protection mechanism provided as part of the Windows Operating System itself. Go to the Data Protection API (DPAPI) Wikipedia page to learn more.
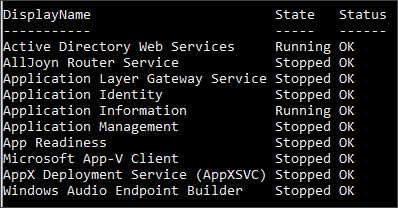
In the code below, the Get-WmiObject cmdlet passes the credential stored in the $cred variable to authorize access to the remote machine named devServer and get the list of services.
Get-WMIObject Win32_Service -ComputerName devServer -Credential $credWhen the script is run, and the authentication succeeds, it should look similar to the screenshot shown below.
With that, you should be able to write a script that uses the encrypted credentials for automation.
Creating and Using a Configuration File
A configuration file usually contains the settings to be used by a program, application or script. Using XML as the format of a configuration file provides the flexibility to design the structure in PowerShell and then export the object to file.
Perhaps you have a script that sends emails to specific recipients. Instead of hard-coding the SMTP settings inside the script, you want to use a configuration file that the script can read. Creating an XML-based configuration file with Export-CliXml is a good way to accomplish that.
A hashtable is the easiest way to create an object to hold configuration data. In the code below, a hashtable is first created to define the details of an SMTP server.
Once the details are finalized, it must be exported to an XML file and will serve as the new configuration file for the script.
# Create the configuration object
$configObject = @{
    SmtpServer = 'mail.posh.lab'
    Port = 25
    From = 'mailer@posh.lab'
    To = 'june@posh.lab','dan@posh.lab'
}
Export the object to XML
$configObject | Export-CliXml -Path .\config.xml
The resulting XML would look like the sample output below.
<Objs Version="1.1.0.1" xmlns="<http://schemas.microsoft.com/powershell/2004/04>"> <Obj RefId="0"> <TN RefId="0"> <T>System.Collections.Hashtable</T> <T>System.Object</T> </TN> <DCT> <En> <S N="Key">Port</S> <I32 N="Value">25</I32> </En> <En> <S N="Key">From</S> <S N="Value">mailer@posh.lab</S> </En> <En> <S N="Key">To</S> <Obj N="Value" RefId="1"> <TN RefId="1"> <T>System.Object[]</T> <T>System.Array</T> <T>System.Object</T> </TN> <LST> <S>june@posh.lab</S> <S>dan@posh.lab</S> </LST> </Obj> </En> <En> <S N="Key">SmtpServer</S> <S N="Value">mail.posh.lab</S> </En> </DCT> </Obj></Objs>Now that a configuration file is created, it can be imported by your script and use its values. Below is the example of how your script can use the imported settings.
The Import-CliXml cmdlet is used to import the contents of the config.xml file. The imported object is then stored in the $config variable. Then, the values inside the $config variable are used as parameter values for the Send-MailMessage cmdlet.
# Import Configuration
$config = Import-CliXml -Path .\config.xml
Send email
Send-MailMessage -SmtpServer $config.SmtpServer
    -Port $config.Port -From $config.From
    -To $config.To `
    -Subject 'This is the subject'
    -Body 'This is the body'
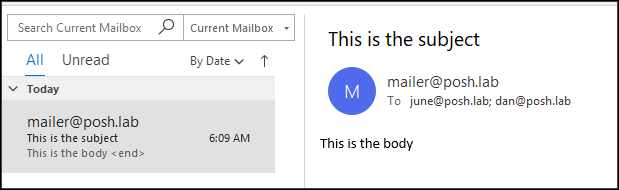
If all goes well when the script is run, the message is sent and received. Using the code above in my development environment produced the email shown below.
Summary
In this article, you've learned how to use the Export-CliXml and Import-CliXml cmdlets for different purposes. You've also learned how the CliXml format is different from the standard XML document format.
Using XML files in PowerShell is not as popular as using other formats such as CSV. However, it is more reliable when preserving the integrity of the object's entire structure when exported to file.
In the end, with the knowledge you've gained in this article, I challenge you to find ways to use XML files with your daily tasks or automation scripts. Perhaps creating a script that gets the weather information online and gets sent to your inbox daily would be a good starting point?