# Creating Your First Azure PowerShell Function App

> _This article was written by June Castillote. He is a frequent contributor to the Adam the Automator (ATA) blog. If you'd like to read more from this author, check out his [ATA author page](http://adamtheautomator.com/author/june). Be sure to also check out [more how-to posts on cloud computing, system administration, IT, and DevOps on adamtheautomator.com](https://adamtheautomator.com)!_

<!-- wp:paragraph -->
<p>You may have already heard the term <em><a href="https://azure.microsoft.com/en-us/overview/serverless-computing/">serverless-computing</a>.</em> Many cloud service providers offer this service, including Microsoft. With Microsoft's <em><a href="https://docs.microsoft.com/en-us/azure/azure-functions/">Azure Functions</a></em>, you can create function apps that support many languages, including Azure PowerShell.</p>
<!-- /wp:paragraph -->

<!-- wp:paragraph -->
<p>Suppose you want to automate issuing software licenses to customers. When the customer paid, your website sends an HTTP request to your Azure Function App. The app then validates payment and automatically sends the license to the customer's email address.</p>
<!-- /wp:paragraph -->

<!-- wp:paragraph -->
<p>That's just one scenario where an Azure Function App can be used. There are more usage scenarios from e-commerce to monitoring and reporting where Azure Function Apps can fit in.</p>
<!-- /wp:paragraph -->

<!-- wp:paragraph -->
<p>In this article, you will learn how to create an Azure PowerShell Function App, develop, test, and execute the code. You'll also get the chance to build a mini-project where you'll create a function for getting the status of Azure VMs and display the result on the web.</p>
<!-- /wp:paragraph -->

<!-- wp:heading -->
<h2 id="h-prerequisites">Prerequisites</h2>
<!-- /wp:heading -->

<!-- wp:paragraph -->
<p>There are several ways to create an Azure PowerShell Function App, and in this article, you will learn the most basic way with the least requirements.</p>
<!-- /wp:paragraph -->

<!-- wp:paragraph -->
<p>To follow along with the instructions, you need to meet these requirements below.</p>
<!-- /wp:paragraph -->

<!-- wp:list -->
<ul><li>You must have a valid Azure account with an active subscription. If you don't have one yet, you can <em><a href="https://azure.microsoft.com/free/?ref=microsoft.com&amp;utm_source=microsoft.com&amp;utm_medium=docs&amp;utm_campaign=visualstudio">create an account for free</a></em>.</li><li>If you do the mini-project at the end of this article, you will need one or more Azure Virtual Machines (<a href="https://docs.microsoft.com/en-us/azure/virtual-machines/windows/quick-create-portal"><em>Windows</em></a> or <em><a href="https://docs.microsoft.com/en-us/azure/virtual-machines/linux/quick-create-portal">Linux</a></em>). Note that you will not use these virtual machines. They only need to exist to report their status using the Azure PowerShell Function App that you will be creating.</li></ul>
<!-- /wp:list -->

<!-- wp:heading -->
<h2 id="h-creating-the-azure-powershell-function-app">Creating the Azure PowerShell Function App</h2>
<!-- /wp:heading -->

<!-- wp:paragraph -->
<p>As you will learn in this article, creating a new Azure Function app is quick and easy as long as you are familiar with the process. The high-level steps to create a simple function app consists of:</p>
<!-- /wp:paragraph -->

<!-- wp:list -->
<ul><li>Creating a new Azure Resource group where the function app will be contained.</li><li>Creating a new general-purpose Azure Storage account.</li><li>Creating a new Function app.</li><li>Creating a new function.</li></ul>
<!-- /wp:list -->

<!-- wp:paragraph -->
<p>There are several ways to create an Azure PowerShell Function App. In this section, you will learn how to create a new Azure Function App using the <em><a href="https://portal.azure.com/">Azure Portal</a></em> and <a href="https://docs.microsoft.com/en-us/powershell/azure/install-az-ps"><em>Azure PowerShell</em></a>.</p>
<!-- /wp:paragraph -->

<!-- wp:heading {"level":3} -->
<h3 id="h-creating-the-function-app-resource">Creating the Function App Resource</h3>
<!-- /wp:heading -->

<!-- wp:paragraph -->
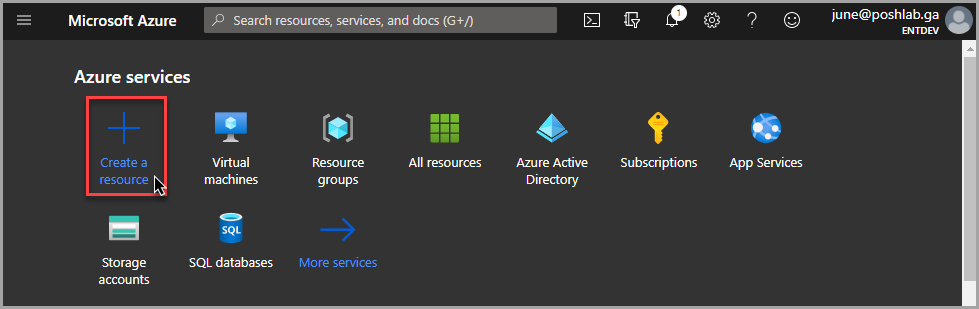
<p>The first step is to log in to the Azure Portal using your credentials. Once logged in, click on the <strong>Create a resource</strong> button.</p>
<!-- /wp:paragraph -->


![Untitled-2020-10-07T151710.660.png](https://cdn.hashnode.com/res/hashnode/image/upload/v1610663990156/lzGkQM8R1.png)

<!-- wp:paragraph -->
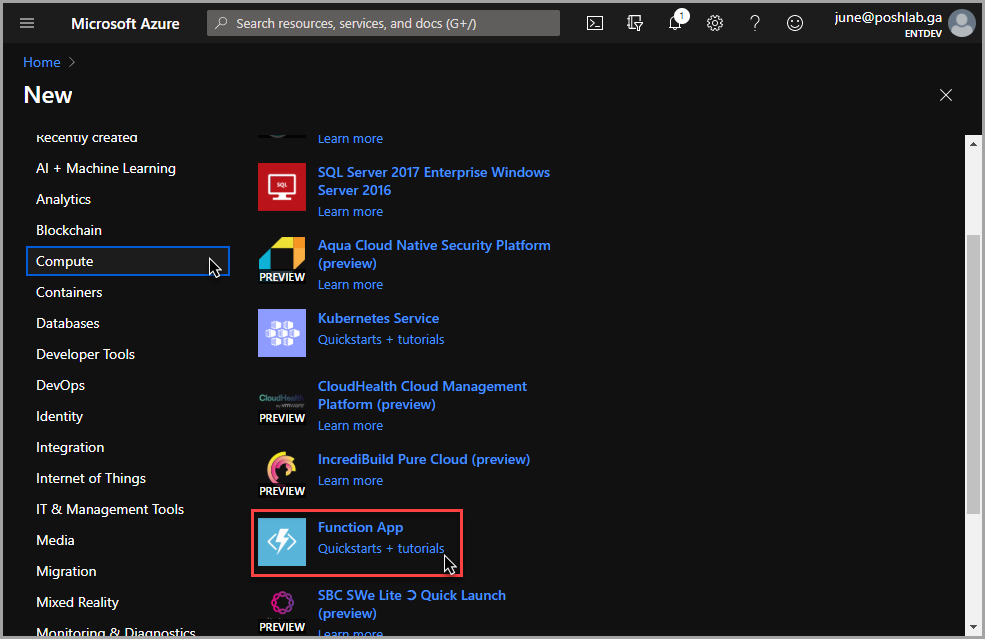
<p>In the <strong>New</strong> page, click on <strong>Compute</strong> and select <strong>Function App</strong> from the list of resources.</p>
<!-- /wp:paragraph -->


![Untitled-2020-10-07T151755.234.png](https://cdn.hashnode.com/res/hashnode/image/upload/v1610664000173/RSNP8fFQK.png)

<!-- wp:paragraph -->
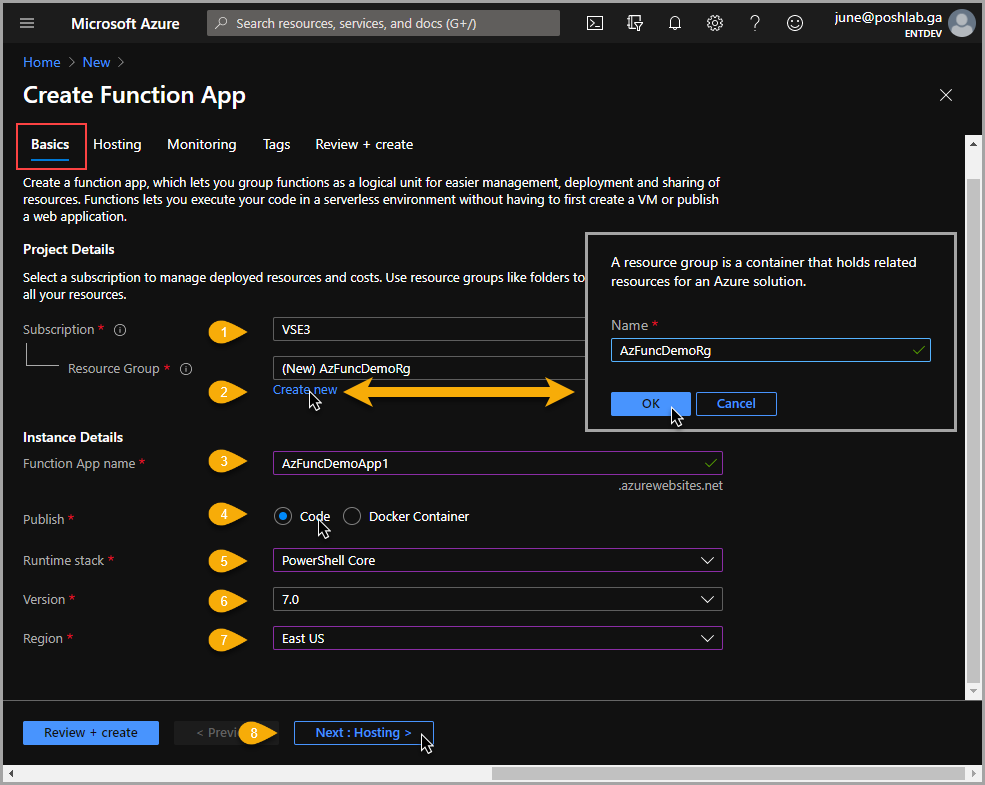
<p>In the <strong>Create Function App</strong> page, under the <strong>Basics</strong> tab, follow these steps.</p>
<!-- /wp:paragraph -->

<!-- wp:list {"ordered":true} -->
<ol><li>Select the Azure subscription where the function app will be created.</li><li>Click on the <strong>Create new</strong> link, specify the name of the new resource group such as <em>AzFuncDemoRg</em>.</li><li>Type in the unique name for the app in the <strong>Function</strong> <strong>App</strong> box. In this example, the name <em>AzFuncDemoApp1</em>.</li><li>There are two <strong>Publish</strong> options, select <em>Code</em>.</li><li>In the Runtime stack dropdown box, select <em>PowerShell Core</em>.</li><li>In the <strong>Version</strong> dropdown box, select <em>7.0</em>.</li><li>Lastly, in the <strong>Region</strong>, select the one closest to you. In this example, the selected region is <em>East US.</em></li><li>Once you're satisfied with the entries, click on the <strong>Next: Hosting</strong> button.</li></ol>
<!-- /wp:list -->

<!-- wp:paragraph -->
<p>The steps above are shown in the screenshot below.</p>
<!-- /wp:paragraph -->


![Untitled-2020-10-07T151904.341.png](https://cdn.hashnode.com/res/hashnode/image/upload/v1610664011589/KR1xFib_W.png)

<!-- wp:paragraph -->
<p>Under the <strong>Hosting</strong> tab, you will create a new Storage Account to host the function app files using the steps below.</p>
<!-- /wp:paragraph -->

<!-- wp:list {"ordered":true} -->
<ol><li>Click on the <strong>Create new</strong> link and create the new storage account with the name <em>azfuncdemostorage1</em>.</li><li>You'll notice that only the Windows option can be selected in <strong>Operating system</strong> selection.</li><li>In the <strong>Plan</strong> selection, choose the <em>Consumption (Serverless)</em> option.</li><li>Once you're done, click on <strong>Review + Create</strong>.</li></ol>
<!-- /wp:list -->


![Untitled-2020-10-07T151940.792.png](https://cdn.hashnode.com/res/hashnode/image/upload/v1610664021981/Zr6dFi88z.png)

<!-- wp:paragraph -->
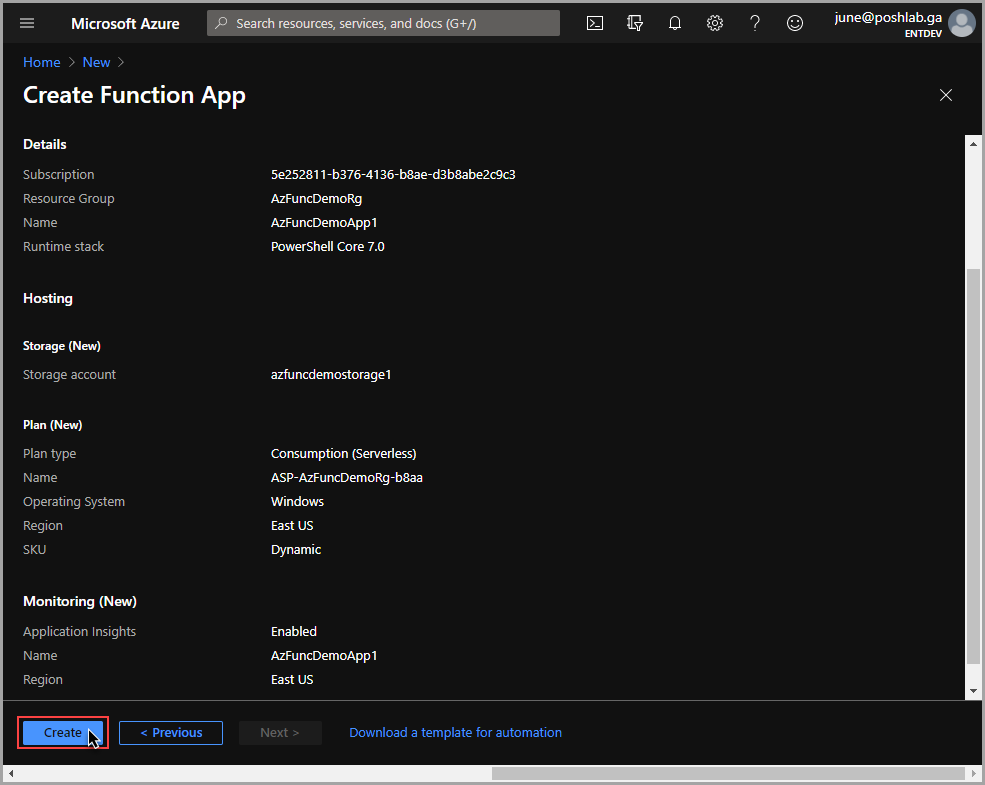
<p>You will now see the summary of the new Azure Function App. Click on the <strong>Create</strong> button to start the resource creation.</p>
<!-- /wp:paragraph -->


![Untitled-2020-10-07T152055.195.png](https://cdn.hashnode.com/res/hashnode/image/upload/v1610664032897/rasvGInTZ.png)

<!-- wp:paragraph -->
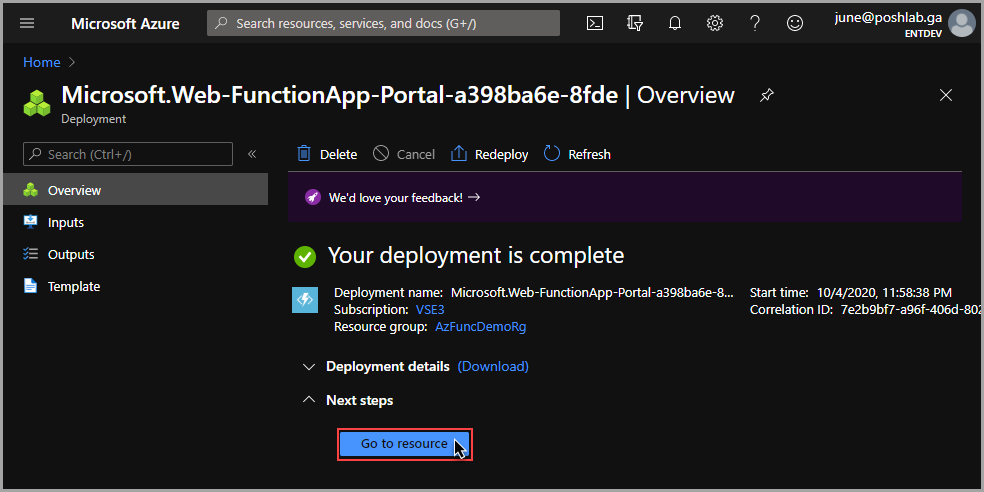
<p>At this point, wait for the deployment to complete, and you should see a similar confirmation page, as shown below. Click on the <strong>Go to resource</strong> button.</p>
<!-- /wp:paragraph -->


![Untitled-2020-10-07T152120.594.png](https://cdn.hashnode.com/res/hashnode/image/upload/v1610664043843/F4PDqYuMj.png)

<!-- wp:heading {"level":3} -->
<h3 id="h-adding-a-new-function">Adding a New Function</h3>
<!-- /wp:heading -->

<!-- wp:paragraph -->
<p>In the previous section, you have created a new Azure PowerShell Function App called <em>AzFuncDemoApp1</em>. But, that new function app does not do anything yet. For the Function App to be useful, you must add a new function to it.</p>
<!-- /wp:paragraph -->

<!-- wp:paragraph -->
<p>Creating a new function requires choosing a template. There are several templates to choose from with different <em>"triggers"</em>. These triggers define when the function is triggered, such as timer-based or by an HTTP request. In this section, you will create a new function that responds to HTTP requests.</p>
<!-- /wp:paragraph -->

<!-- wp:paragraph -->
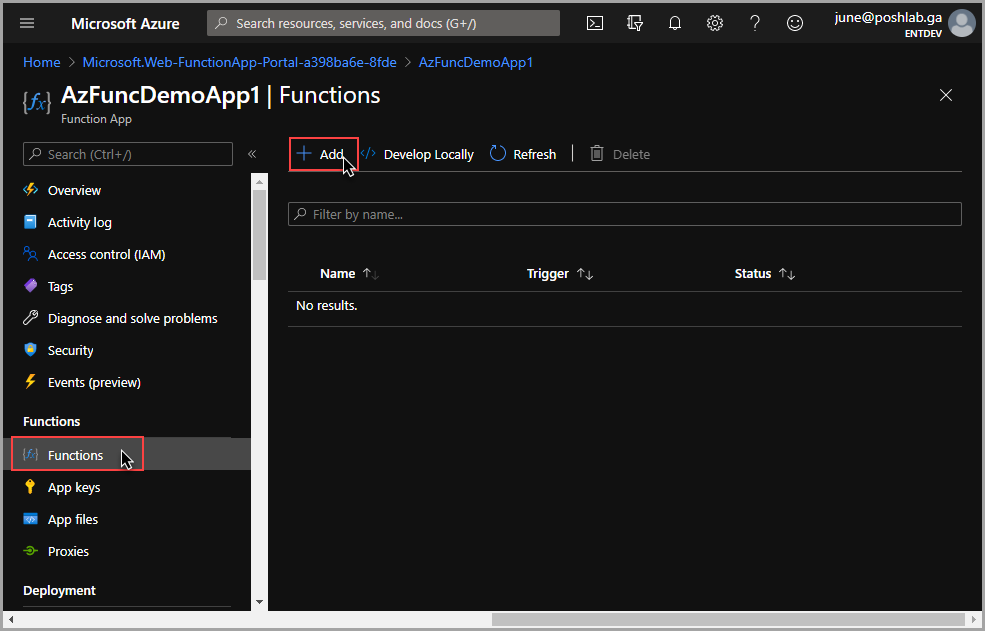
<p>To create an HTTP Request-based function, under the <strong>Functions</strong> section of the <strong>AzFuncDemoApp1</strong> page, click on <strong>Functions</strong>. Then, click on the <strong>Add</strong> button.</p>
<!-- /wp:paragraph -->


![Untitled-2020-10-07T152153.071.png](https://cdn.hashnode.com/res/hashnode/image/upload/v1610664054365/1Etk0TIfy.png)

<!-- wp:paragraph -->
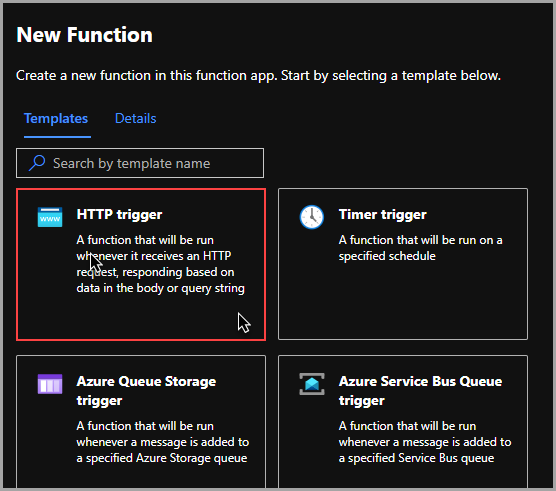
<p>Then, in the <strong>New Function</strong> fly-out, click on the <strong>HTTP trigger</strong> template option.</p>
<!-- /wp:paragraph -->


![Untitled-2020-10-07T152220.824.png](https://cdn.hashnode.com/res/hashnode/image/upload/v1610664064485/SG69J40BA.png)

<!-- wp:paragraph -->
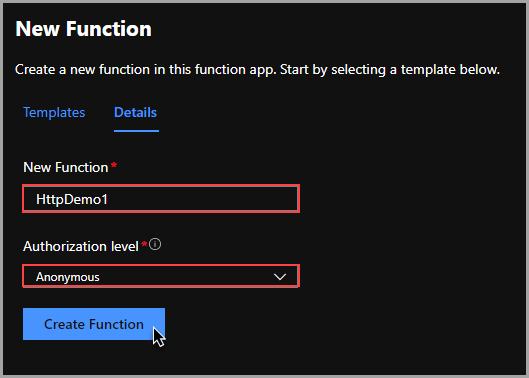
<p>Then, in the <strong>Details</strong> tab, type in the name of the new function. In this example, the function name is <em>HttpDemo1</em>. Then, in the <strong>Authorization level</strong>, select <em>Anonymous</em>. There are other authorization levels, but since this function is not confidential or sensitive, anonymous should be sufficient.</p>
<!-- /wp:paragraph -->


![Untitled-2020-10-07T152246.362.png](https://cdn.hashnode.com/res/hashnode/image/upload/v1610664073509/I5hNnsZ_1.png)

<!-- wp:paragraph -->
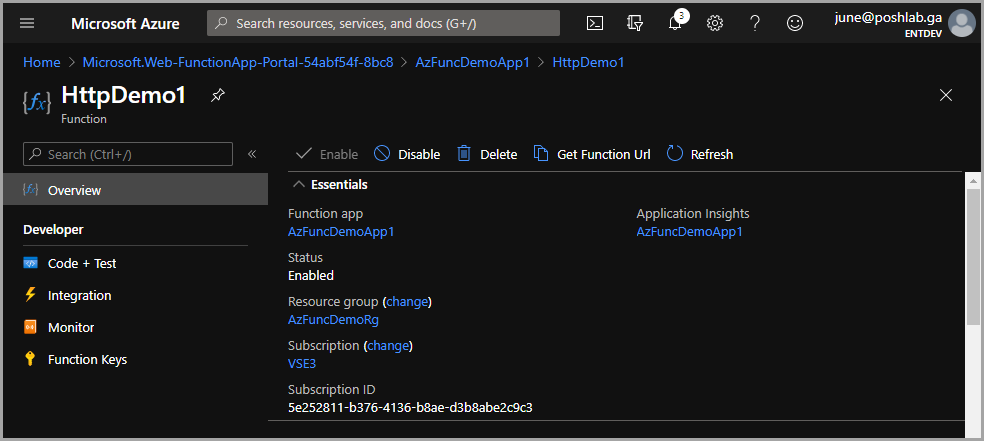
<p>After the function is created, you should be redirected to the <strong>HttpDemo1</strong> function page, as shown below.</p>
<!-- /wp:paragraph -->


![Untitled-2020-10-07T152315.004.png](https://cdn.hashnode.com/res/hashnode/image/upload/v1610664082359/aoxFmcyan.png)

<!-- wp:heading {"level":3} -->
<h3 id="h-testing-the-function">Testing the Function</h3>
<!-- /wp:heading -->

<!-- wp:paragraph -->
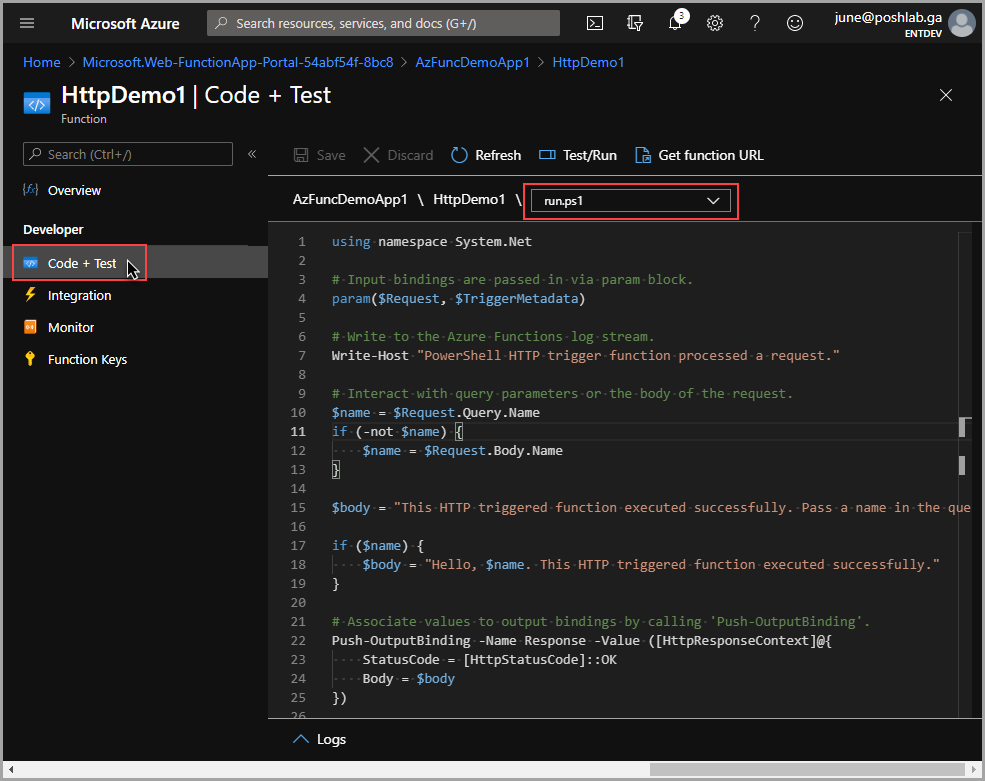
<p>After creating a new function, a PowerShell script file is automatically created with the name <em>run.ps1</em>. This script file contains the default code that is executed when the function is triggered. To view this <em>run.ps1</em> file, go to the <strong>Code + Test</strong> under the <strong>Developer</strong> section.</p>
<!-- /wp:paragraph -->


![Untitled-2020-10-07T152337.202.png](https://cdn.hashnode.com/res/hashnode/image/upload/v1610664090868/W1Xp9KxPf.png)

<!-- wp:paragraph -->
<p>Below is the code that is automatically populated in the <em>run.ps1</em> file using the HTTP request template.</p>
<!-- /wp:paragraph -->

<!-- wp:code -->
<pre class="wp-block-code"><code lang="powershell" class="language-powershell">using namespace System.Net

# Input bindings are passed in via param block.
param($Request, $TriggerMetadata)

# Write to the Azure Functions log stream.
Write-Host "PowerShell HTTP trigger function processed a request."

# Interact with query parameters or the body of the request.
$name = $Request.Query.Name
if (-not $name) {
    $name = $Request.Body.Name
}

$body = "This HTTP triggered function executed successfully. Pass a name in the query string or in the request body for a personalized response."

if ($name) {
    $body = "Hello, $name. This HTTP triggered function executed successfully."
}

# Associate values to output bindings by calling 'Push-OutputBinding'.
Push-OutputBinding -Name Response -Value ([HttpResponseContext]@{
    StatusCode = [HttpStatusCode]::OK
    Body = $body
})</code></pre>
<!-- /wp:code -->

<!-- wp:paragraph -->
<p>The expected action of the code above is to display a message based on the logic below.</p>
<!-- /wp:paragraph -->

<!-- wp:paragraph -->
<p>If the function is triggered without the <em>Name</em> parameter, the message to be returned is:</p>
<!-- /wp:paragraph -->

<!-- wp:code -->
<pre class="wp-block-code"><code lang="powershell" class="language-powershell">This HTTP triggered function executed successfully. Pass a name in the query string or in the request body for a personalized response.</code></pre>
<!-- /wp:code -->

<!-- wp:paragraph -->
<p>If the function is triggered with the <em>Name</em> parameter, the message to be returned is:</p>
<!-- /wp:paragraph -->

<!-- wp:code -->
<pre class="wp-block-code"><code lang="powershell" class="language-powershell">Hello, &lt;NAME&gt;. This HTTP triggered function executed successfully.</code></pre>
<!-- /wp:code -->

<!-- wp:paragraph -->
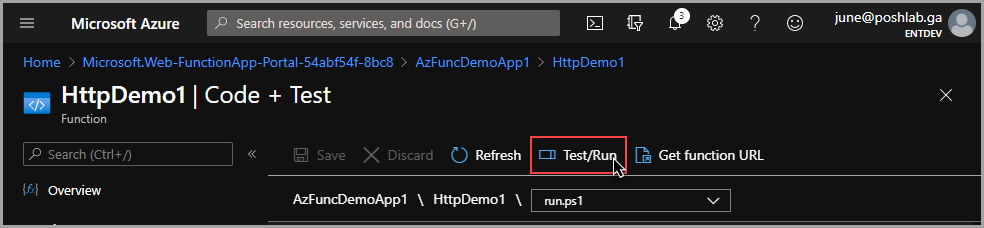
<p>Now, to test the code, click on the <strong>Test/Run</strong> button.</p>
<!-- /wp:paragraph -->


![Untitled-2020-10-07T152540.926.png](https://cdn.hashnode.com/res/hashnode/image/upload/v1610664104934/TouaYHkMd.png)

<!-- wp:paragraph -->
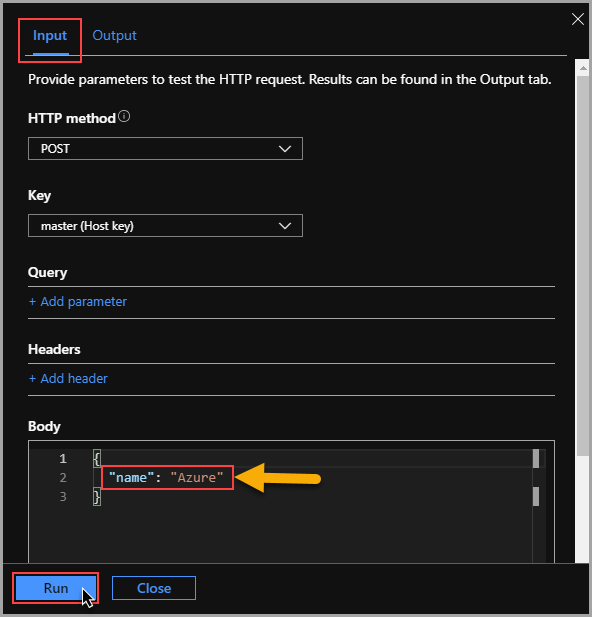
<p>Once the test fly-out shows up, leave the the <strong>Input</strong> tab's default values, then click on <strong>Run.</strong></p>
<!-- /wp:paragraph -->


![Untitled-2020-10-07T152607.859.png](https://cdn.hashnode.com/res/hashnode/image/upload/v1610664114097/mupxikY9N.png)

<!-- wp:paragraph -->
<p>Wait for the test to complete, and you should see the HTTP response, as shown below.</p>
<!-- /wp:paragraph -->


![Untitled-2020-10-07T152633.451.png](https://cdn.hashnode.com/res/hashnode/image/upload/v1610664123144/9mr6eDnBT.png)

<!-- wp:heading {"level":3} -->
<h3 id="h-executing-the-function">Executing the Function</h3>
<!-- /wp:heading -->

<!-- wp:paragraph -->
<p>Now that you've tested the function and confirmed that it is working, the next step is to execute the code the way it was designed for - by issuing an HTTP request.</p>
<!-- /wp:paragraph -->

<!-- wp:paragraph -->
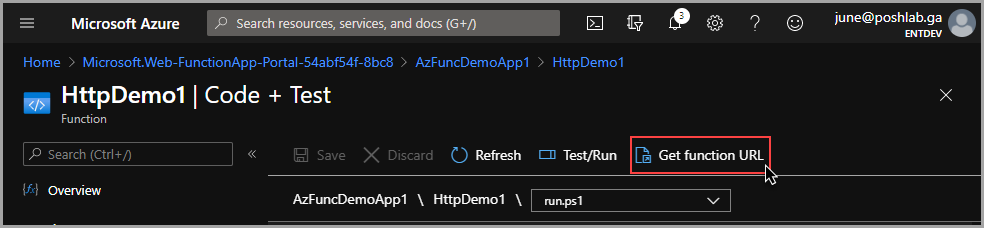
<p>To execute the function, you first need to get the function's URL. To do so, click on the <strong>Get function URL</strong> button.</p>
<!-- /wp:paragraph -->


![Untitled-2020-10-07T152702.314.png](https://cdn.hashnode.com/res/hashnode/image/upload/v1610664133548/_Oa8OtErK.png)

<!-- wp:paragraph -->
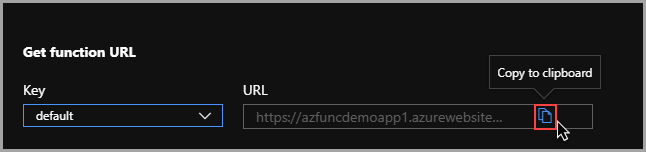
<p>Next, copy the URL to the clipboard.</p>
<!-- /wp:paragraph -->


![Untitled-2020-10-07T152731.607.png](https://cdn.hashnode.com/res/hashnode/image/upload/v1610664142810/5SxiSRoEa.png)

<!-- wp:paragraph -->
<p>Now that you have the function URL, you can use your browser to navigate to that URL, as shown below. In this example, the URL is <a href="https://azfuncdemoapp1.azurewebsites.net/api/HttpDemo1"><em><code>https://azfuncdemoapp1.azurewebsites.net/api/HttpDemo1</code></em></a></p>
<!-- /wp:paragraph -->


![Untitled-2020-10-07T152803.901.png](https://cdn.hashnode.com/res/hashnode/image/upload/v1610664153605/5LmgIFTKJ.png)

<!-- wp:paragraph -->
<p>The output above is what's expected if the function was triggered without the <em>name</em> parameter value. To execute the function with the <em>name</em> parameter, append the parameter and its value to the URL. Below is the example of the URL with the name parameter.</p>
<!-- /wp:paragraph -->

<!-- wp:code -->
<pre class="wp-block-code"><code lang="powershell" class="language-powershell">&lt;https://azfuncdemoapp1.azurewebsites.net/api/HttpDemo1?name=June&gt;</code></pre>
<!-- /wp:code -->

<!-- wp:paragraph -->
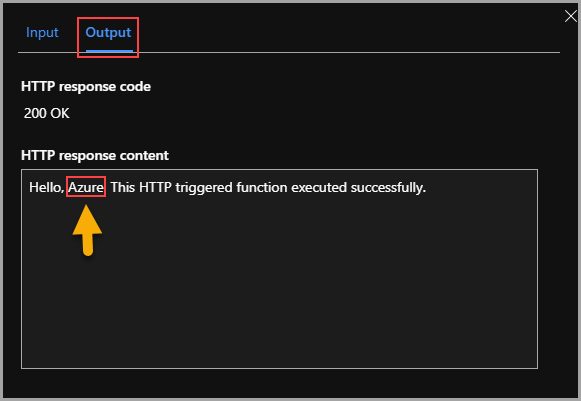
<p>The result below shows the output when the <em>name</em> parameter is used with the HTTP request.</p>
<!-- /wp:paragraph -->


![Untitled-2020-10-07T152837.068.png](https://cdn.hashnode.com/res/hashnode/image/upload/v1610664164612/p0VwuZSbG.png)
<!-- wp:heading -->
<h2 id="h-mini-project-azure-powershell-function-to-get-virtual-machine-status">Mini-Project: Azure PowerShell Function to Get Virtual Machine Status</h2>
<!-- /wp:heading -->

<!-- wp:paragraph -->
<p>It is now time to put your knowledge into practice. In this project, you will create a new function that is triggered by HTTP requests. Once the function is triggered, the code will get the status of the Azure VMs and return the information in the browser.</p>
<!-- /wp:paragraph -->

<!-- wp:paragraph -->
<p>Note that you do not need to create a new Azure PowerShell Function App as you will reuse the <em>AzFuncDemoApp1</em> you've created previously.</p>
<!-- /wp:paragraph -->

<!-- wp:heading {"level":3} -->
<h3 id="h-enabling-managed-identity">Enabling Managed Identity</h3>
<!-- /wp:heading -->

<!-- wp:paragraph -->
<p>Since this project involves accessing Azure resources, you'll need to modify the <em>AzFuncDemoApp1</em> to use a <em><a href="https://docs.microsoft.com/en-us/azure/active-directory/managed-identities-azure-resources/overview">Managed Identity</a></em>. A Managed Identity is essentially an <em><a href="https://adamtheautomator.com/azure-service-principals-how-to-create-and-understand-them/">Azure Service Principal</a></em> that enables your function to authenticate to Azure and access resources. In this case, you'll be using a managed identity to read the Azure VM status.</p>
<!-- /wp:paragraph -->

<!-- wp:paragraph -->
<p>There are two types of managed identity that you can assign to the Azure Function App; <em>System assigned</em> and <em>User assigned</em>. For simplicity, you will enable the <em>System assigned</em> identity in this project.</p>
<!-- /wp:paragraph -->

<!-- wp:paragraph -->
<p>To enable the System assigned identity, follow these steps.</p>
<!-- /wp:paragraph -->

<!-- wp:list {"ordered":true} -->
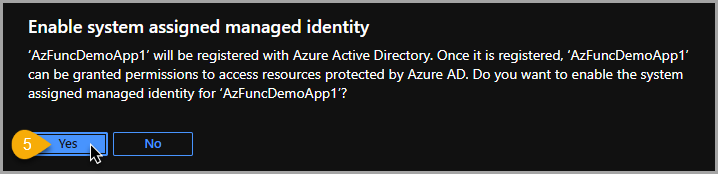
<ol><li>In the Function app <em>AzFuncDemoApp1</em>, go to the <strong>Identity</strong> menu blade.</li><li>You will see two tabs; System assigned and User assigned. Stay in the System assigned tab.</li><li>Next, click on the <strong>Status</strong> switch to turn on the <em>System assigned</em> identity.</li><li>Finally, click on the <strong>Save</strong> button.</li><li>You will be asked to confirm your choice. Click on <strong>Yes</strong>.</li></ol>
<!-- /wp:list -->


![Untitled-2020-10-07T152909.358.png](https://cdn.hashnode.com/res/hashnode/image/upload/v1610664176932/pL18DAyGJ.png)
<!-- wp:image {"align":"center","id":4450,"sizeSlug":"full"} -->
<div class="wp-block-image"><figure class="aligncenter size-full"><img src="https://adamtheautomator.com/wp-content/uploads/2020/10/Untitled-2020-10-07T152938.809.png" alt="Confirm to enable the identity" class="wp-image-4450"/><figcaption>Confirm to enable the identity</figcaption></figure></div>
<!-- /wp:image -->

<!-- wp:heading {"level":3} -->
<h3 id="h-assigning-an-azure-role-permission">Assigning an Azure Role (Permission)</h3>
<!-- /wp:heading -->

<!-- wp:paragraph -->
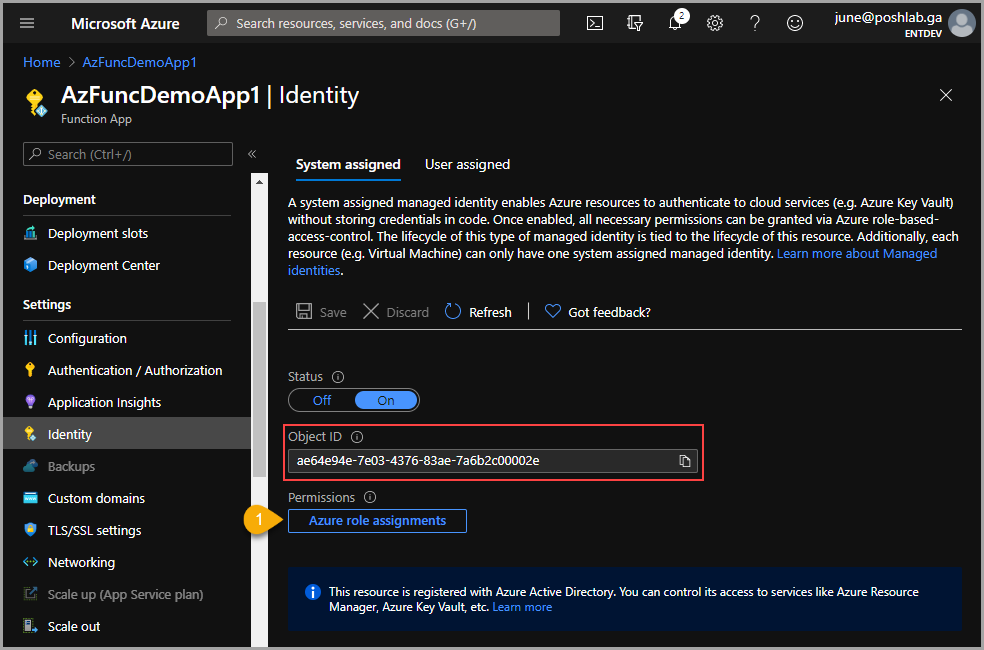
<p>Once the identity is enabled, you would see that the <em>Object ID</em> has been created for the identity. At this point, the identity does not have any role assignment or permission yet. In this section, you will assign the <em><a href="https://docs.microsoft.com/en-us/azure/role-based-access-control/built-in-roles#reader">Reader role</a></em> to the identity.</p>
<!-- /wp:paragraph -->

<!-- wp:paragraph -->
<p>To assign the role, first, click on the <strong>Azure role assignments</strong> button. It will take you to the <strong>Azure role assignments</strong> page.</p>
<!-- /wp:paragraph -->


![Untitled-2020-10-07T153003.777.png](https://cdn.hashnode.com/res/hashnode/image/upload/v1610664187515/fV1MyO_9x.png)

<!-- wp:paragraph -->
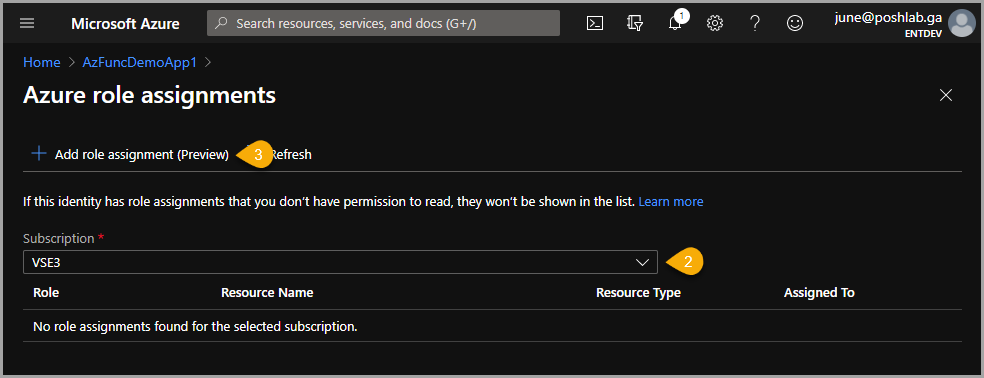
<p>In the <strong>Azure role assignments</strong> page, choose the Azure <strong>Subscription</strong> (if you have more than one). Then, click on <strong>Add role assignment</strong>.</p>
<!-- /wp:paragraph -->


![Untitled-2020-10-07T153030.964.png](https://cdn.hashnode.com/res/hashnode/image/upload/v1610664197165/jjQ5-6dpt.png)

<!-- wp:paragraph -->
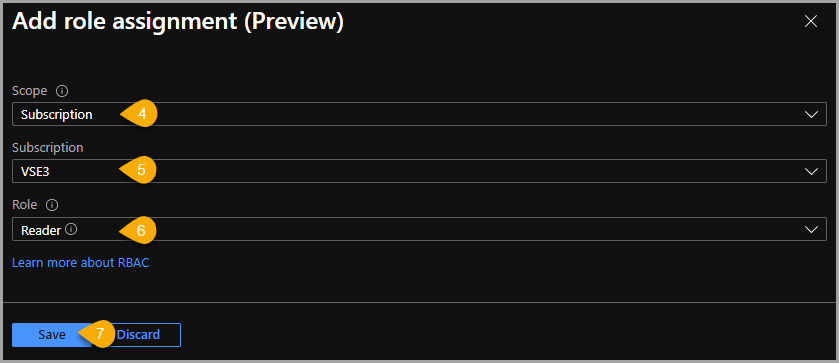
<p>Next, in the <strong>Scope</strong>, choose <em>Subscription</em> then choose the right subscription name. In the <strong>Role</strong>, select Reader. Lastly, click on Save.</p>
<!-- /wp:paragraph -->


![Untitled-2020-10-07T153108.983.png](https://cdn.hashnode.com/res/hashnode/image/upload/v1610664207300/z4YfoSB5m.png)

<!-- wp:paragraph -->
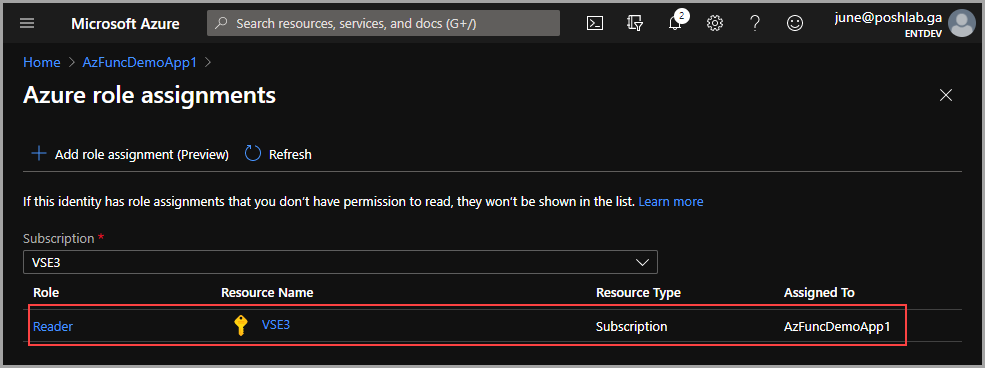
<p>After saving the role assignment, you should see that the new role has been assigned.</p>
<!-- /wp:paragraph -->


![Untitled-2020-10-07T153141.397.png](https://cdn.hashnode.com/res/hashnode/image/upload/v1610664216581/ujzXnmMiq.png)

<!-- wp:heading {"level":3} -->
<h3 id="h-editing-the-function-and-adding-the-new-code">Editing the Function and Adding the New Code</h3>
<!-- /wp:heading -->

<!-- wp:paragraph -->
<p>The identity has been enabled, and permission has been assigned. What's left now is to update the function code. By now, you should already know where to go to edit the function code. Once you are in the <strong>Code + Test</strong> page of the function, update the existing code using the code below.</p>
<!-- /wp:paragraph -->

<!-- wp:code -->
<pre class="wp-block-code"><code lang="powershell" class="language-powershell">using namespace System.Net

# Input bindings are passed in via param block.
param($Request, $TriggerMetadata)

# Write to the Azure Functions log stream.
Write-Host "Getting the Azure Virtual Machine Status."

# Get the Azure VM status
$vmList = (Get-AzVM -Status | Select-Object Name, PowerState)

# Associate values to output bindings by calling 'Push-OutputBinding'.
Push-OutputBinding -Name Response -Value ([HttpResponseContext]@{
        StatusCode = [HttpStatusCode]::OK
        Body       = $vmList
        headers    = @{ "content-type" = "application/json" }
    })</code></pre>
<!-- /wp:code -->

<!-- wp:paragraph -->
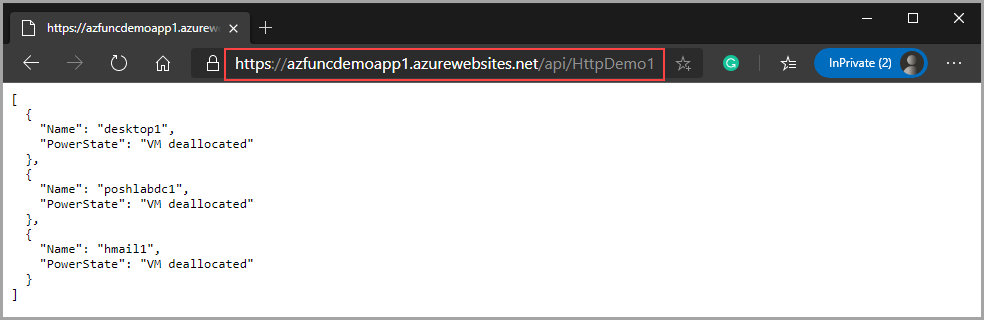
<p>Once you've updated the code, save it, and execute the function URL in your browser. The example below shows that the function could get the Azure VM status and returned the information as expected.</p>
<!-- /wp:paragraph -->


![Untitled-2020-10-07T153214.441.png](https://cdn.hashnode.com/res/hashnode/image/upload/v1610664228417/mZEI7i3px.png)

<!-- wp:paragraph -->
<p>You now have a working function that gets and returns the Azure VM status. However, the output is in JSON format and looks ugly. Remember, you control how you want the information is displayed; you just need to modify your code.</p>
<!-- /wp:paragraph -->

<!-- wp:paragraph -->
<p>Suppose you want the function to return a more presentable output. In that case, you can modify the code to return the result as HTML with custom formatting. Using the code below, you can make the function return the same information but in a table with style.</p>
<!-- /wp:paragraph -->

<!-- wp:code -->
<pre class="wp-block-code"><code lang="powershell" class="language-powershell">using namespace System.Net

# Input bindings are passed in via param block.
param($Request, $TriggerMetadata)

# Write to the Azure Functions log stream.
Write-Host "Getting the Azure Virtual Machine Status."

$head = @'
&lt;!DOCTYPE HTML PUBLIC "-//W3C//DTD HTML 4.01 Frameset//EN" "&lt;http://www.w3.org/TR/html4/frameset.dtd&gt;"&gt;
&lt;html&gt;&lt;head&gt;&lt;title&gt;Virtual Machine Status&lt;/title&gt;
&lt;style type="text/css"&gt;
table {
    font-family: Verdana, Geneva, sans-serif;
    border: 1px solid #1C6EA4;
    background-color: #EEEEEE;
    text-align: left;
    border-collapse: collapse;
  }
  table td, table th {
    border: 1px solid #AAAAAA;
    padding: 3px 2px;
  }
  table tbody td {
    font-size: 13px;
  }
  table tr:nth-child(even) {
    background: #D0E4F5;
  }
  table thead {
    background: #1C6EA4;
    border-bottom: 2px solid #444444;
  }
  table thead th {
    font-size: 15px;
    font-weight: bold;
    color: #FFFFFF;
    text-align: left;
    border-left: 2px solid #D0E4F5;
  }
  table thead th:first-child {
    border-left: none;
  }
&lt;/style&gt;
'@

# Get the Azure VM status
$vmList = (Get-AzVM -Status | Select-Object Name, PowerState | ConvertTo-Html -Head $head)

# Associate values to output bindings by calling 'Push-OutputBinding'.
Push-OutputBinding -Name Response -Value ([HttpResponseContext]@{
        StatusCode = [HttpStatusCode]::OK
        Body       = [string]$vmList
        headers    = @{ "content-type" = "text/html" }
    })</code></pre>
<!-- /wp:code -->

<!-- wp:paragraph -->
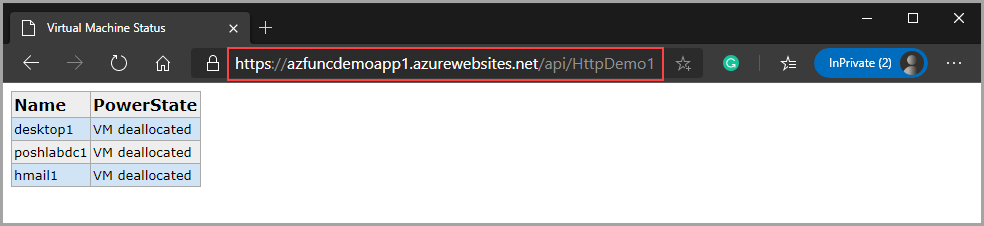
<p>Once you update the function code using the code above, save it, and then execute the function URL again. This time, you should see a similar output, as shown in the image below.</p>
<!-- /wp:paragraph -->


![Untitled-2020-10-07T153252.239.png](https://cdn.hashnode.com/res/hashnode/image/upload/v1610664243063/Y9yg19j9A.png)

<!-- wp:heading -->
<h2 id="h-summary">Summary</h2>
<!-- /wp:heading -->

<!-- wp:paragraph -->
<p>Azure Functions is a quick way to create apps that can be a new system or a part of an already existing workflow to complement and automate some processes. It is reasonably priced (cheap), and there's even a <em><a href="https://azure.microsoft.com/en-us/pricing/details/functions/">monthly grant</a>.</em> You may potentially run functions at no additional cost!</p>
<!-- /wp:paragraph -->

<!-- wp:paragraph -->
<p>Additionally, with Azure Functions, you do not need to worry about server maintenance. That way, you can keep your focus on maintaining your application.</p>
<!-- /wp:paragraph -->

<!-- wp:paragraph -->
<p>In this article, you've learned how to create a new Azure PowerShell Function App. You've learned how to create a function triggered by HTTP requests and accept parameters in queries. You've also learned how to enable managed identities to allow your Function Apps to access Azure resources without embedding the authentication in your code.</p>
<!-- /wp:paragraph -->

<!-- wp:paragraph -->
<p>What you've learned here are just the basics. There are other ways to create Azure Function apps that include using the command-line or Visual Studio Code. The code provided in the examples here can be improved and integrated with other Azure resources.</p>
<!-- /wp:paragraph -->

<!-- wp:paragraph -->
<p>Hopefully, the knowledge you gained in this article helps you get started with using Azure Functions in your job, including development, monitoring, or even reporting, to name a few.</p>
<!-- /wp:paragraph -->

<!-- wp:heading -->
<h2 id="h-further-reading">Further Reading</h2>
<!-- /wp:heading -->

<!-- wp:list -->
<ul><li><a href="https://docs.microsoft.com/en-us/azure/azure-functions/"><strong><em>Azure Functions Documentation</em></strong></a></li><li><em><a href="https://adamtheautomator.com/updating-to-powershell-7/"><strong>Upgrading to PowerShell 7: A Walkthrough</strong></a></em></li><li><em><a href="https://adamtheautomator.com/azure-service-principals-how-to-create-and-understand-them/"><strong>Azure Service Principals: How to Create (and Understand) Them</strong></a></em></li><li><em><a href="https://adamtheautomator.com/microsoft-azure-for-free/"><strong>Microsoft Azure for Free?</strong></a></em></li></ul>
<!-- /wp:list -->